Blog
- Details
Android Studio is the official integrated development environment for Google's Android operating system, built on JetBrains' IntelliJ IDEA software and designed specifically for Android development. It is available for download on Windows, macOS and Linux based operating systems.
Source: https://en.wikipedia.org/wiki/Android_Studio
When you install Android Studio, there is an option to install the Intel Emulator (HAXM).
But if you do not have a Intel CPU, but instead have a AMD CPU, HAXM is not very useful.
So uncheck that. But luckily, there is an option for AMD CPUs after installation.
Android Studio -> Tools -> SDK Manager
SDK Tools tab
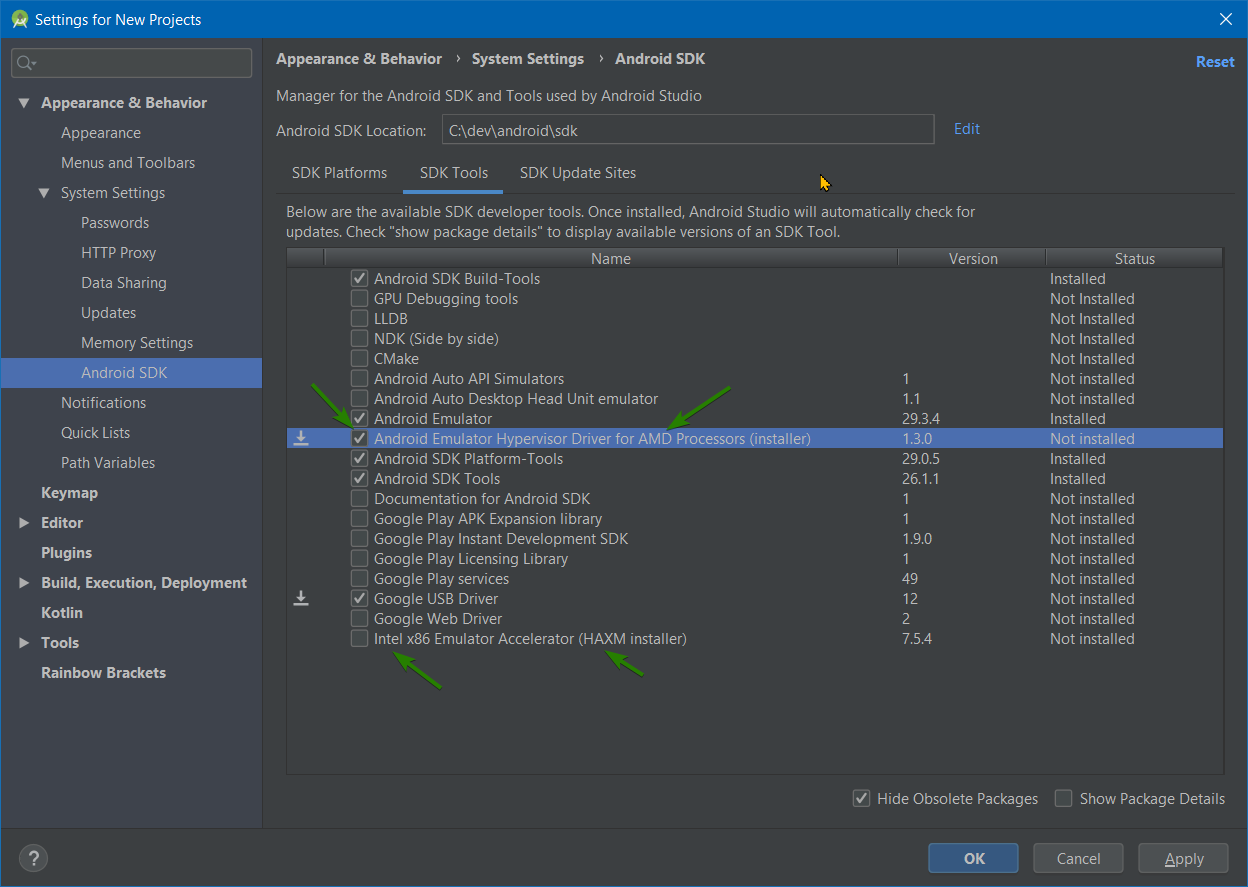
In the list, there is an option for the AMD Emulator
Android Emulator Hypervisor Driver for AMD Processors (installer)
Which "makes it possible to the emulator on AMD CPUs without needing to enable Hyper-V and with performance on par with HAXM"
Source: https://androidstudio.googleblog.com/2019/11/android-emulator-hypervisor-for-amd.html
You can also uncheck the
Intel x86 Emulator Accelerator (HXAM installer)
if you checked it during the initial install.
You may also want to check the
Google USB Driver
if you want to later debug/test with an a phone connected via usb
Also, you will need to enable Windows Hypervisor Platform
Note: You do not have to install the full Hypervisor VM, so you can still use VirtualBox or such.
Control Panel -> Programs and Features-> Turn Windows features on or off (left side)
Scroll down, enable Windows Hypervisor Platform
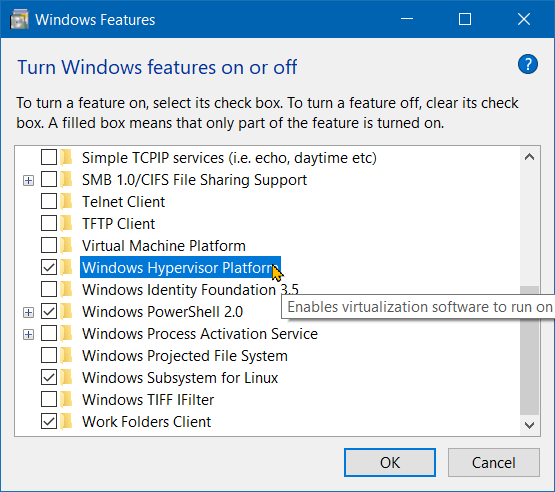
Even if not prompted to reboot on save, you need to reboot to enable the feature
You should now be able to create and launch an Android Emulator
Tools -> AVD Manager
Select an x86_64 image with google play
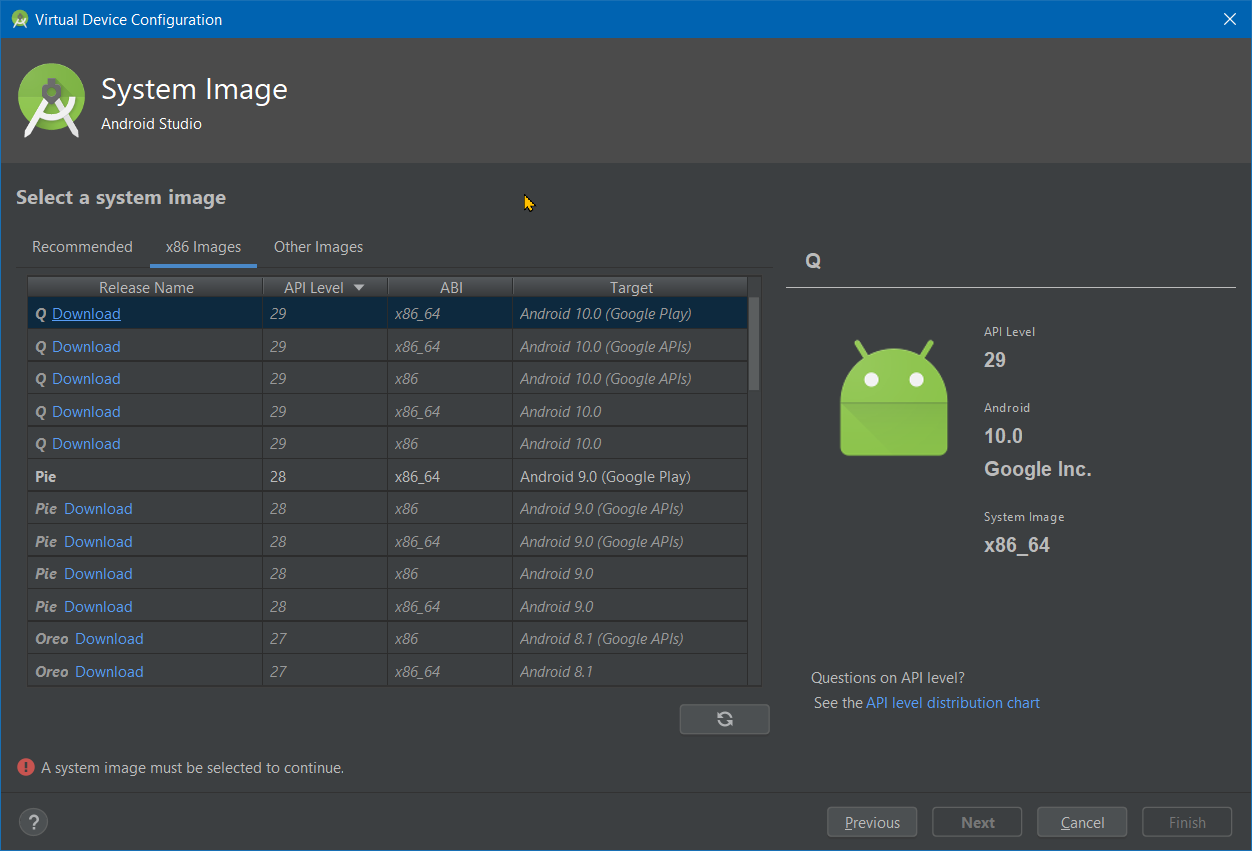
Click Next and Finish
Note: You may still be prompted with an Intel HAXM dialog, probably a Android Studio bug.
Obviously Intel HAXM will fail to install/configure. But that is OK as the Android Emulator will still launch.
You should now have a usable Android Emulator, code away.
-End of Document-
Thanks for reading
- Details
> cd c:\dev\git\flutter
> flutter doctor
> flutter config --android-sdk c:\dev\android\sdk
> flutter doctor --android-licenses
> flutter doctor
Source: https://flutter.dev/docs/get-started/install/windows
> c:\dev\git\flutter
And updated the environment Path to include
c:\dev\git\flutter
And installed Android Studio, which will install the Android SDK.
c:\Users\[user]\AppData\Local\Android\sdk
But you may want a shorter and more accessible location such asc:\dev\android\sdk
Which is what causes Flutter to be flustered to not find the Android SDKYou should run flutter doctor, which validates your installation
> cd c:\dev\git\flutter
> flutter doctor

Well, the first error is Flutter cannot find the Android SDK.
If you installed the Android SDK into a custom location, such as
c:\dev\android\sdk
You will need to tell Flutter about its location,
which is not in the installation instructions.
> flutter config --android-sdk C:\dev\android\sdk
Source: https://github.com/flutter/flutter/issues/15114#issuecomment-431793370
> flutter doctor

I guess if you run a Flutter project or run the emulator you may get the license prompts then, but might as well accept them now.
> flutter doctor --android-licenses
Make sure you thoroughly read them, and dispute them if you do not agree, yup.
Running flutter doctor again yields> flutter doctor

So all good.
Flutter knows where the Android SDK is installed.
Note: While IntelliJ IDEA Ultimate Edition can also be used for Flutter and Android development, Android Studio is gracefully made by IntelliJ so the interfaces are similar, with Android Studio obviously being more targeted toward Android development. Also most tutorials, internet how/what searches will reference Android Studio.
- Details
GitLab is a web-based DevOps lifecycle tool that provides a Git-repository manager providing wiki, issue-tracking and CI/CD pipeline features, using an open-source license, developed by GitLab Inc.
Source: https://en.wikipedia.org/wiki/GitLab
Both Deploy Keys and Deploy Tokens allow you to checkout code without using your personal GitLab username/password. And as their name indicates, they are best suited for deployments, usually automated/scripted. What are their features?
Deploy Keys
- Utilize SSH keys (public and private)
- Checkout via SSH (requires port 22 open)
- GitLab will store the public SSH key
- The server doing the checkout will have to have the private SSH key
- Allows read and/or write of repository
- More steps for setup
Deploy Tokens
- Use a generate once password ie token
- Check via HTTPS (requires port 443 open, more common)
- Token can have an expiration date
- Allows read only of repository
- Simpler setup
How to create and use Deploy Keys (SSH)
By default, when you use SSH, it reads from ~/.ssh/id_rsa
But that is your personal SSH key
Create a SSH key for GitLab deployments with a unique name
Login to the server where you will clone/deploy your code
> ssh-keygen -t rsa -b 4096 -f ~/.ssh/gitlab_deploy_rsa
Tell ssh about the new gitlab key
> vim ~/.ssh/config
Host gitlab.yourdomain.com
Preferredauthentications publickey
IdentityFile ~/.ssh/gitlab_deploy_rsa
Note: for the Host, use the host GitLab references
GitLab: Repo: Clone button
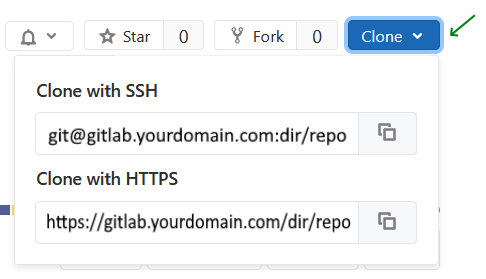
For security, and to allow SSH, make the config read only by you
> chmod 600 ~/.ssh/config
So GitLab knows about your new key, create a GitLab Deploy Key
GitLab: Repo: Settings -> Repository, scroll to Deploy Keys
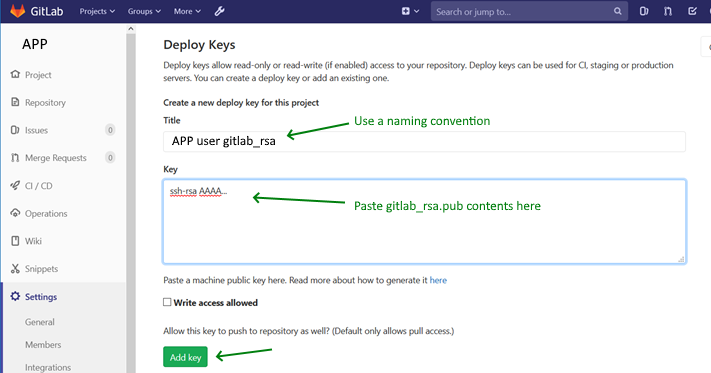
Copy the contents of your public key ~/.ssh/gitlab_rsa.pub to the Key section
Back on your server,
Test that SSH access works
> ssh -vT
-T Disable pseudo-terminal allocation ie just give return result "as is"
-v verbose
If SSH times out, try a public site to ensure port 22 is open
> ssh -vT gitlab.com
If SSH gitlab.com does not work, then enable port 22 on your server, most likely via it's firewall.
If SSH gitlab.com does work, then maybe SSH is not enabled or accessible on your GitLab server. Review your GitLabs firewall ie iptables, tcp wrappers ie /etc/hosts.deny and /etc/hosts.allow, and the SSH daemon configuration ie /etc/sshd_config
Source: https://unix.stackexchange.com/a/406264/265278
Assuming
> ssh -vT
finally works
You should be able to checkout your code using SSH, using
> git clone
which is a slight shorthand for
> git clone ssh://
Note: If you cannot get SSH working, you can try using Deploy Tokens, which uses HTTPS, which is more often accessible.
How to create and use Deploy Tokens (HTTPS)
Create a GitLab Deploy Token
GitLab: Repo: Settings -> Repository, scroll to Deploy Tokens
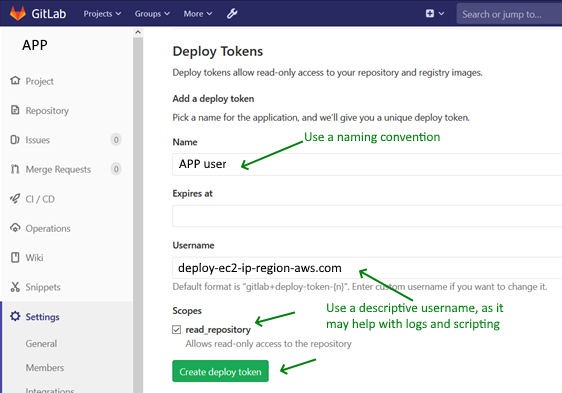
After creating the Deploy Token, make sure to copy and save the token
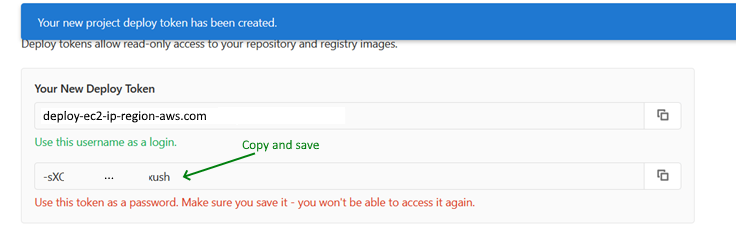
From your server, you can checkout your code using
> git clone https://<username>:<token>@gitlab.yourdomain.com/dir/repo.git target_dir
After cloning, you can simply Pull changes
> git pull
So, should you use SSH or HTTPS?
Ideally you should use SSH keys as they are a way to identify trusted computers, without involving passwords, but HTTPS is the easiest to set up on the widest range of networks and platforms.
Source: https://stackoverflow.com/questions/11041729/why-does-github-recommend-https-over-ssh
-End of Document-
Thanks for reading
- Details
When you create a AWS RDS MySQL instance, you will be asked to also create a master username/password. The master RDS user acts like the root user of all it's databases, with full access to SQL commands such as DROP and CREATE. While you can use this root user within your applications, you should create an application specific database user with limited privileges, which will prevent harm from accidental and malicious use.
Note: AWS (Amazon Web Services) RDS (Relational Database Service) is a managed service, and it doesn't provide SYS access (SUPER privileges)
View permissions of root user
Show grants for RDS MySQL root user ie master username
SQL:
SHOW GRANTS FOR 'professor';
Result:
GRANT SELECT, INSERT, UPDATE, DELETE, CREATE, DROP, RELOAD, PROCESS, REFERENCES, INDEX, ALTER, SHOW DATABASES, CREATE TEMPORARY TABLES, LOCK TABLES, EXECUTE, REPLICATION SLAVE, REPLICATION CLIENT, CREATE VIEW, SHOW VIEW, CREATE ROUTINE, ALTER ROUTINE, CREATE USER, EVENT, TRIGGER ON *.* TO `professor`@`%` WITH GRANT
Create new application user
Create a new user to be used by just the application
SQL:
CREATE USER 'express_app'@'%' IDENTIFIED BY '20charRandomPwd';
Note: The username should be related to the application, and the password does not need to be readable as it will only be used within the application configuration.
Grant permissions
For application users, remove:
CREATE, DROP, RELOAD, PROCESS, REFERENCES, INDEX, ALTER, SHOW DATABASES, CREATE TEMPORARY TABLES, LOCK TABLES, CREATE VIEW, SHOW VIEW, CREATE ROUTINE, ALTER ROUTINE, CREATE USER, EVENT
Leaving the basics:
SELECT, INSERT, UPDATE, DELETE, EXECUTE, REPLICATION SLAVE, REPLICATION CLIENT, TRIGGER
Note: MySQL permissions reference
SQL:
GRANT SELECT, INSERT, UPDATE, DELETE, EXECUTE, REPLICATION SLAVE, REPLICATION CLIENT, TRIGGER ON *.* TO `express_app`@`%` WITH GRANT OPTION;
Note: If using multiple databases in a RDS instance, then grant access only to the required databases ie ON `planet.*` TO `express_app`
You can now use the newly created, and restricted, database user express_app in your application.
-End of Document-
Thanks for reading