Blog
- Details
By putting a cleanup Lifecycle rule in place on your S3 buckets, you may be able to potentially save costs and increase LIST performance.
"Incomplete Multipart Uploads – S3’s multipart upload feature accelerates the uploading of large objects by allowing you to split them up into logical parts that can be uploaded in parallel. If you initiate a multipart upload but never finish it, the in-progress upload occupies some storage space and will incur storage charges. However, these uploads are not visible when you list the contents of a bucket and (until today’s release) had to be explicitly removed.
Expired Object Delete Markers – S3’s versioning feature allows you to preserve, retrieve, and restore every version of every object stored in a versioned bucket. When you delete a versioned object, a delete marker is created. If all previous versions of the object subsequently expire, an expired object delete marker is left. These markers do not incur storage charges. However, removing unneeded delete markers can improve the performance of S3’s LIST operation."
Source: https://aws.amazon.com/blogs/aws/s3-lifecycle-management-update-support-for-multipart-uploads-and-delete-markers/
To add a cleanup Lifecycle rule:
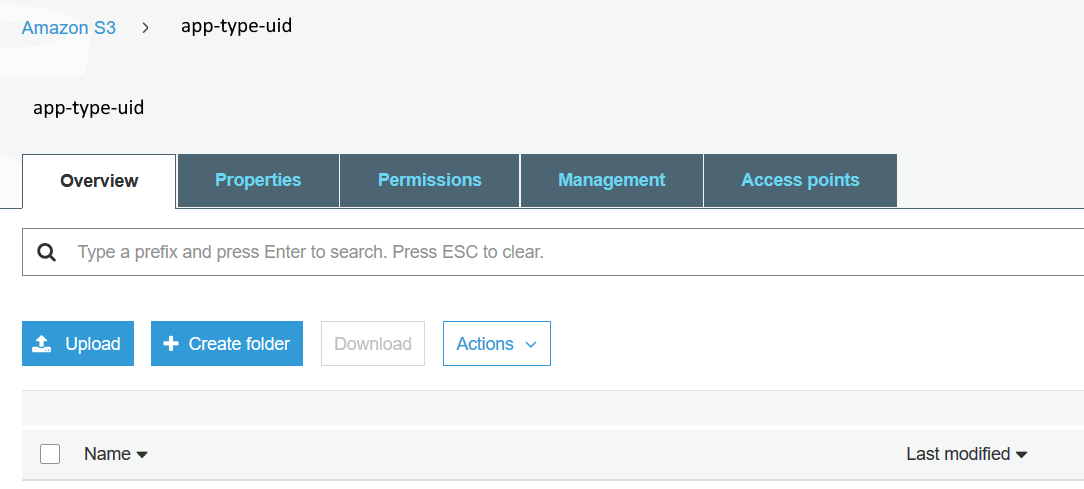
- Log into the Amazon S3 web console
- Select your S3 bucket
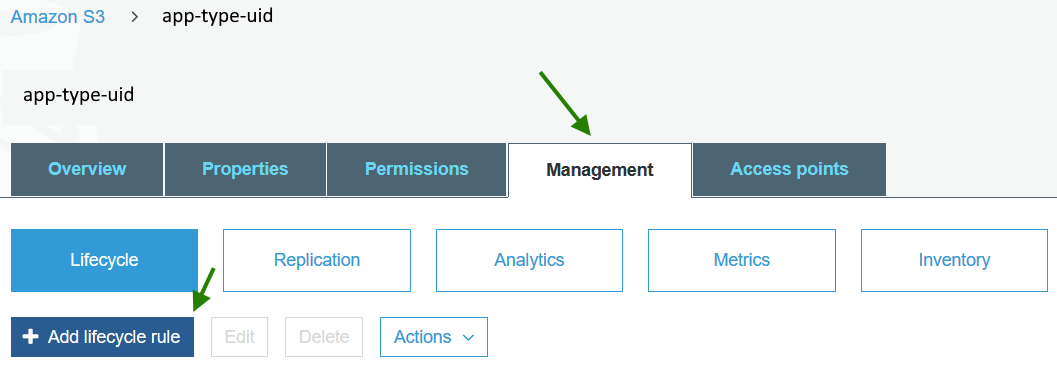
- Select Management
- Select Add lifecycle rule
- Enter a name such as
'Delete incomplete multipart upload and Delete previous versions'
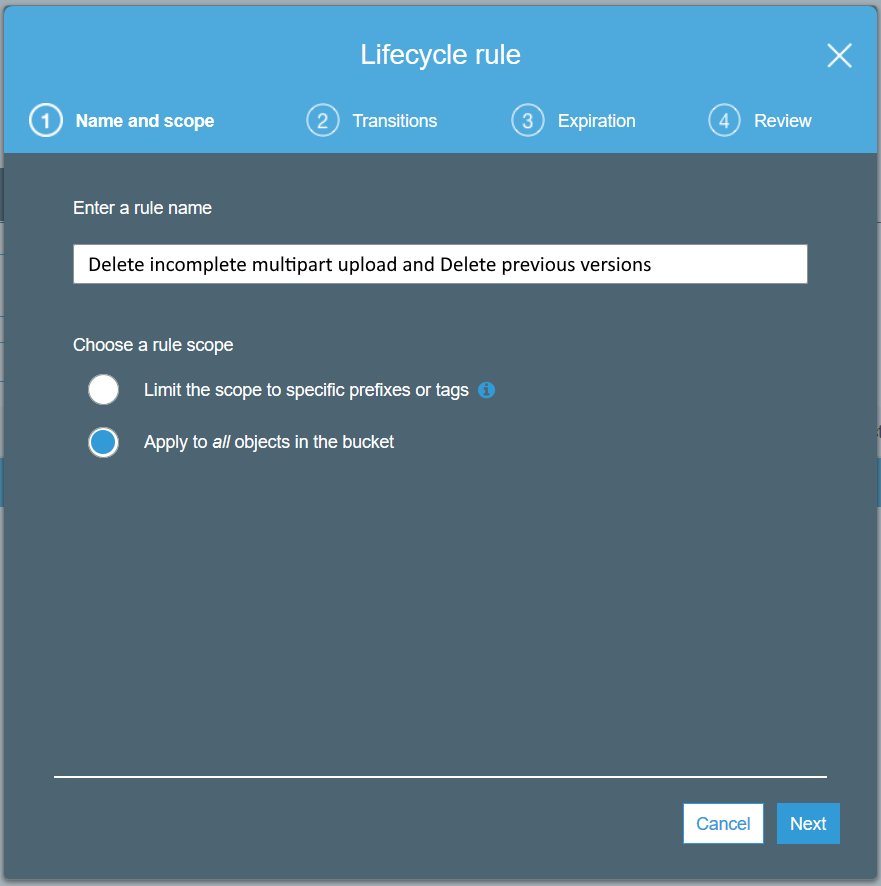
- Skip Transitions for now
Transitions allow you to move storage to slower locations at a reduced cost
https://docs.aws.amazon.com/AmazonS3/latest/dev/lifecycle-transition-general-considerations.html
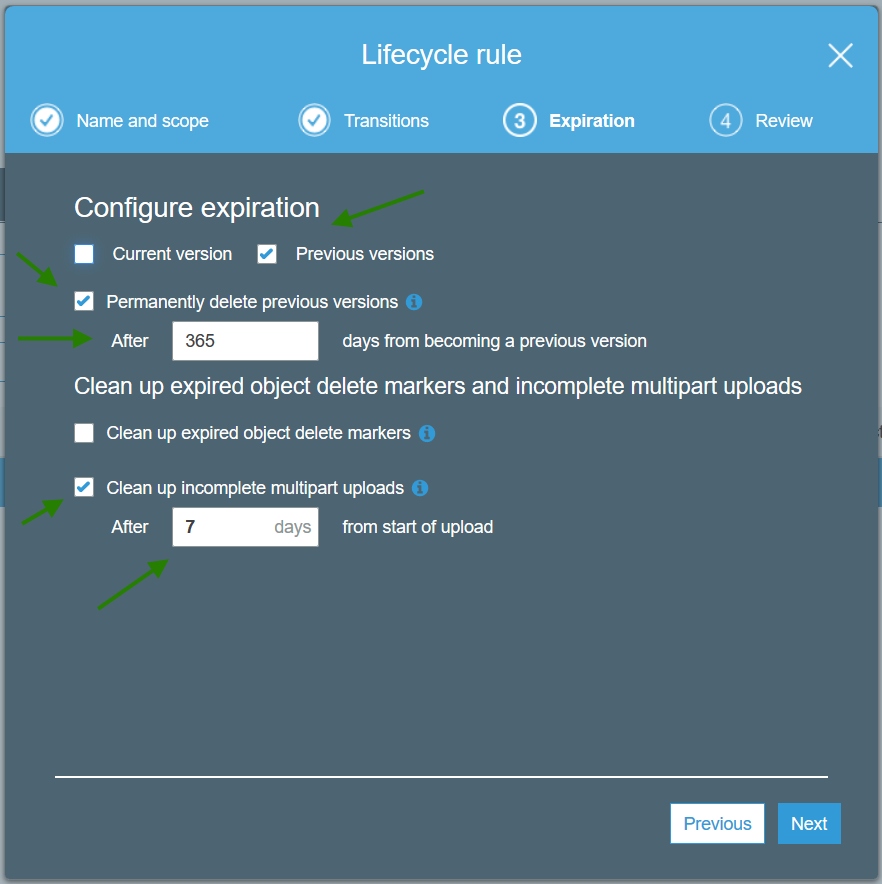
- Expiration
- Delete Previous versions after 365 days
You can choose shorter periods such as 7 days or 30 days if you don’’t have a use case for retrieving prior S3 versions.
You will still have the current version, which is usually all you want, but deleting previous versions can help with costs and S3 LIST performance.
-
- Clean up incomplete multipart uploads after 7 days
If you do not have any automated processes that may re-try uploads, you could choose 1 day
- Review
Agree to the 'scary' this applies to all objects in bucket
Note, if you have S3 objects (uploads) which require different policies, you may find it easier to manage by creating a S3 bucket per policy.
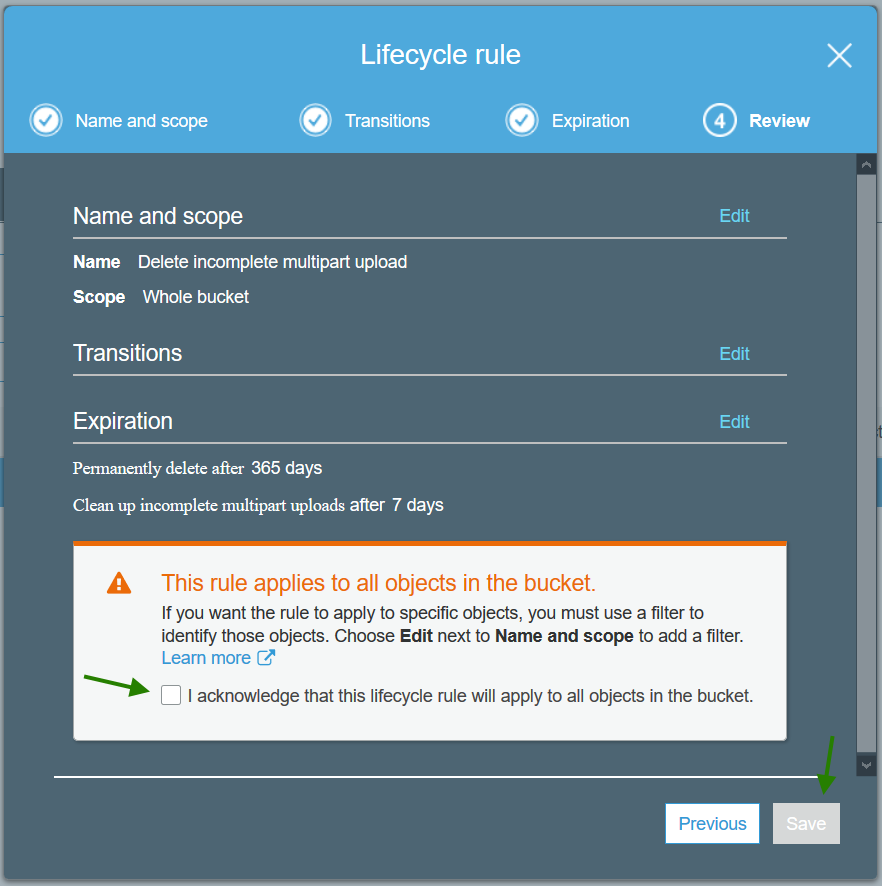
You now have some basic cleanup of your S3 bucket(s) configured.
- Details
- Details
Most Git workflows do not address picking what is released. Once a feature branch has been merged back to 'development', it is in the release pipe, pending QA and Business validation. Once in 'development', code/branches cannot easily or arbitrarily be plucked out to go directly to production as the code is often intermingled with other branches. But the code changes in 'development' can be manually re-coded (Git patches help) into a hotfix branch from 'master'/'production' with the risk of not being QA-ed.
The 'Git single branch strategy' primarily removes the pain point of the conflicts between 'master' and 'development', while providing a clearer history of production releases, and an easier rollback with switching branches.
Generally picking what to release is largely mitigated by how, and the order in which Tickets are chosen. However, the release pipe can be slowed down by a Ticket/branch needing time to fix, or be validated by QA or Business. To remove the blocking branch, depending on the changes, the feature could be hidden, or removed if a small change, or more likely wait for the fix(es) and QA.
Hopefully the upfront choosing of Tickets and quality of specifications somewhat mitigates the blockers.
Some Git strategies to mitigate blockers in the release pipe, which are caused by Tickets that often require feedback once seen.
1) Put less in the release pipe: (Less is more)
If limit releases to one branch per release, then there is no re-picking once in 'development'. Basically the other feature branches would queue up waiting to be picked and for merge to 'development' and QA-ed. Which leads to the pros and cons of Staging branches.
2) Staging branches:
Another process to maybe help with picking branches for release is to not merge feature branches back to 'development' until picked. The feature branches could be deployed to their own directory (devsite.com/branch/123-shortdesc) be QA-ed, reviewed by Business, then if ok, merged to 'development'. Then when decided to go to production, everything currently in 'development' is QA-ed again, fixes added via branch updates or a new branch, and then released via 'master'/'production'.
Note, if after being merged to 'development', production release decisions change, well, then we are back to the same problem of doing hotfixes, or hiding not ready functionality, or waiting for the fixes.
Also this approach can be a burden on the developers: fixes enhancements, code cleanups, won't be seen or utilized until the branch is picked, and those fixes/enhancements might be required or desired for another branch, thus duplication of code which probably means conflicts later. Before merging the feature branch to 'development', 'development' would need to be merged back to the feature branch to handle any changes or conflicts in the branch, so the developer can test again before merging to 'development'. And as the code won't be fresh on the developers mind, there is a higher risk of mistakes to be made during the merge to 'development'.
pros:
- able to preview branches before release
- able to choose branches for release
cons:
- more work for Business and/or QA as the merged branches in ‘development’ still need to be reviewed
- if decisions change to remove a branch or hotfix a branch to production before qa, same problems
- more burden on developers, potential conflicts, developing the branch twice: once orig, then later (days, weeks) when picked
- dev-ops + some app work to make 'their own directory' happen
Committing often, merging often seems to be better for code quality.
3) Feedback branches, Preview branches: (A hybrid of Staging branches)
For branches which require Business or early QA feedback, after development is done, but before QA or merging to 'development', push the branch to a preview location (devsite.com/branch/123-shortdesc). There it can be previewed for one or two days, before being merged to 'development' and moved to QA; required feedback branches should not be held for a long time, else the cons of Staged branches may become apparent. The branches that require feedback should be marked as such before development. Every branch should not be marked as requires feedback, only a few should be.
pros:
- able to preview branches marked as feedback before release
- should reduce fixes needed when in 'development' for QA
- as only a day or two delay, no large time incurred burden on developers
cons:
- does not allow changing order of released branches
- more work for Business and/or QA as the merged branches in ‘development’ still need to be reviewed
- if decisions change to remove a branch or hotfix a branch to production before QA, same problems
- dev-ops work + some app work to make 'preview location' happen

Hopefully some useful Git strategies when dealing with Tickets that often require feedback once seen.
-End of Document-
Thanks for reading
- Details
A common Git workflow has two main branches, 'development' and 'master'. With the common workflow of creating feature branches from ‘development’, merging the feature branch back to ‘development’, and then for a release to production, merging 'development' to 'master'. Non-trivial conflicts can occur during the merge to 'master' when same/similar changes are made in both 'master' and 'development', or 'development' has had some necessary reverts or other changes.
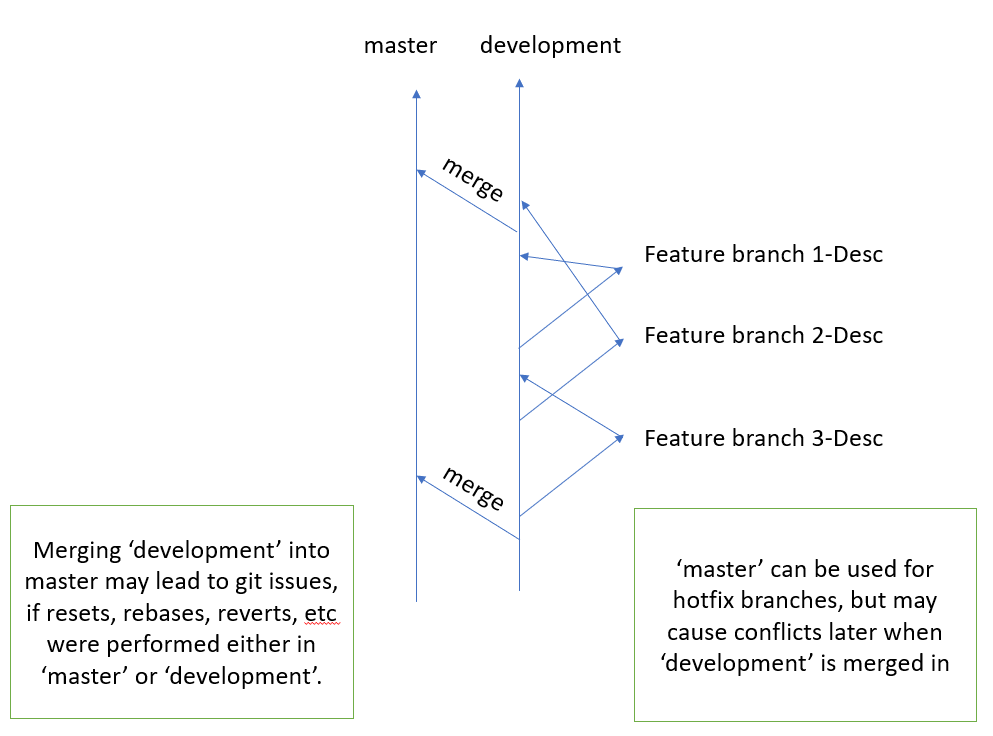
Instead of having two main or long lived branches, another idea for a Git workflow is to use only one main branch, then create a branch for production pulls.
aka 'trunk-based development workflow' or 'single branch strategy'
Think of the one main branch as the 'development' branch
- flow for development would be the same:
- branch from 'development' for a Ticket, merge request to 'development' when done
- when want to do a release to production, instead of a merge request to 'master'
- create a new 'production' branch at the last or desired 'development' commit
- when want to do another release to production
- rename current 'production' to 'production-date' ie 'production-20200531'
- create a new 'production' branch at the last or desired 'development' commit
- 'master' branch would then be unused and eventually removed
- current purpose of 'master' is:
release this code, which will be the purpose of 'production'
- 'development' is never merged into 'production'
- overtime, like feature branches, old 'production-date' branches can be deleted

pros:
- never any conflicts between 'master' eg 'production' and 'development', as only one main branch
- hotfixes can be applied to current 'production' branch without worry of later conflicts
- 'production-date' can be used as a rollback for code in case a release is non usable/broken and code related
cons:
- no 'master' branch; but 'production' and 'development' are more explicit
- no merge request to 'master'; 'production' and 'production-*' can be marked as a protected branches in GitLab
- slightly different
GitLab CI/CD:
- should still work at creation of 'production',
- and maybe the renaming of 'production-date' and creation of 'production' could be part of the GitLab CI/CD
Tags:
An alternative to creating 'production' branches would be to create 'production' tags. If a hotfix is needed, then create a branch from the tag. But just keeping everything a branch simplifies: GitLab CI/CD, Git UIs, merge request for hotfix, etc
And yes, the one branch to rule them all could be named the default Git repo branch name of ‘master’. Or 'sam', or whatever your group agrees upon, and you can tell others.
-End of Document-
Thanks for reading