MBrownieBytes

A blog for software engineers, sys admins, devops, and the technically inclined.
How to guides, Tutorials, Tips and Tricks

  1. You are here:  
  2. Home

Blog

PHP Execution Stats

Details
Published: 22 March 2021
  • php

Sometimes you want to know how long a script took and how much memory it consumed.

Run Time and Memory used can also be useful if tracked overtime, for example in:

  • cron/cli scripts
  • web requests
  • api requests

While tools such as New Relic (paid), DataDog (paid), NetData (opensource), Prometheus (opensource) could be used, sometimes a simpler local solution is all that is needed.

Here is a simple Trait to extend your classes with

<?php

namespace App\Traits;

trait Stats
{
    private $timer_start;
    private $timer_finish;

    public function statsTimerStart()
    {
        $this->timer_start = microtime(true);
    }

    public function statsTimerFinish()
    {
        $this->timer_finish = microtime(true);
    }

    public function statsTimerRuntime()
    {
        if (empty($this->timer_finish)) {
            $this->statsTimerFinish();
        }


        $runtime = $this->timer_finish - $this->timer_start;
        return gmdate('H:i:s', $runtime);
    }

    public function statsMemoryUsed()
    {
        $memory_used = memory_get_peak_usage(true);

        return $this->statsFormatBytes($memory_used);
    }

    public function statsFormatBytes(int $bytes, int $precision = 2)
    {
        $units = ['B', 'KB', 'MB', 'GB', 'TB', 'PB'];
        $unit_index = 0;

        while ($bytes > 1024) {
            $bytes /= 1024;
            $unit_index++;
        }
        return round($bytes, $precision) . $units[$unit_index];
    }

} 


Basic usage:

$this->statsTimerStart()

.. do stuff ..

log 'stuff processed in ' . $this->statsTimerRuntime() . ' using ' . $this->statsMemoryUsed();


github gist

-End of Document-
Thanks for reading

Slim PHP from the command line

Details
Published: 22 February 2021
  • php

Slim is a PHP micro framework that helps you quickly write simple yet powerful web applications and APIs. 
https://www.slimframework.com/

Slim can also be used to run scripts or commands from the command line, also known as the cli.

While libraries such as symfony/console or even slim/console can be used, they can be rather cumbersome ie heavy when all you want to do is run a command and have access to your existing code and services in Slim.

The basic flow of a Slim API call could be envisioned as:
    uri -> route -> action -> use query params

From the command line, there is no uri.
But maybe we could take the cli arguments and map that to a uri, and thus a route.

Perhaps such as 
> php cli.php /cli/dostuff

Hmm, /cli/dostuff sure looks like a uri, right?
That can be mapped a Slim route nicely.

How about
> php cli.php /cli/dostuff?verbose=1&dryrun=1

Calling 

$request->getQueryParams() 
should return
verbose = 1
dryrun = 1

But what if we use arguments in a more common cli fashion?
> php cli.php /cli/dostuff verbose=1 dryrun=1

Hmm, verbose and dryrun still look like query string params
Would be nice if calling 
$request->getQueryParams() 
would return
verbose = 1
dryrun = 1

But what if we use arguments in a more typical cli fashion?
> php cli.php /cli/dostuff -verbose -dryrun

Hmm, verbose and dryrun do not look like query string params, but what if they were mapped to a key, such as argv?
Would be nice if calling 
$request->getQueryParams() 
would return
argv = [-verbose, -dryrun] 

Well, for those changes and more, create a new file, named something such as runrundorun.php or maybe just cli.php. Place the new file below public, in the project root, at the same level as public, src, vendor, etc.

In cli.php, we will map the command line arguments to a uri, so Slim can test against routes, and then bootstrap Slim as normal.

cli.php
<?php

if (PHP_SAPI != 'cli') {
    exit("CLI only");
}

if (empty($argv) || count($argv) < 2) {
    exit("Missing route for CLI");
}

// remove calling script
array_shift($argv);

// get route + params from 1st argument
$uri = array_shift($argv);

// group routes by /cli/
if (strpos($uri, '/cli/') !== 0) {
    // handle os shell quirks
    // windows git bash
    if (strpos($uri, 'C:/Program Files/Git/cli/') === 0) {
        $uri = str_replace('C:/Program Files/Git/cli/', '/cli/', $uri);
    } else {
        echo "uri: " . $uri . PHP_EOL;
        exit("CLI Route must start with /cli/");
    }
}

// get any more arguments
if (!empty($argv)) {
    $additional = '';
    foreach ($argv as $arg) {
        if (strpos($arg, '=') !== false) {
            // r=1 d=10
            $additional .= '&' . $arg;
        } else {
            // normal args -r 10, store as argv
            $additional .= '&argv[]=' . $arg;
        }
    }
    if (strpos($uri, '?') === false) {
        $uri .= '?';
    }
    $uri .= $additional;
}
// set uri based on cli arguments
$_SERVER['REQUEST_URI'] = $uri;

// normal Slim app, routes_cli_*, ActionCli
(require __DIR__ . '/cfg/bootstrap.php');
GitHub gist

So now just add a route for /cli/dostuff and call your code!
> php [/app/]cli.php /uri/mapped/to/route?param1=v1 argv1=v1 argv0

Extra:
Now, if you are running cli commands, you probably do not want errors returned as html.
You can add a customer error handler and return just text or maybe something with a little structure, such as json.  See the example in the official Slim docs to add a ErrorHandler to return json.
https://www.slimframework.com/docs/v4/objects/application.html

-End of Document-
Thanks for reading

Cypress configuration and organization

Details
Published: 15 January 2021
  • cypress
  • tests
Cypress is a next generation front end testing tool built for the modern web.

Instead of using an external listener, such as Selenium, which can be 'flaky' at times waiting for responses, Cypress has been built to run in the browser so it can more accurately monitor and react to requests. More information can be found at Cypress.io

The following will install Cypress, give some configuration and organization recommendations, and show how to persist sessions. Writing the tests is up to you! (Write your first test)


Install
In the base of your application, make a tests directory, and a cypress directory, as you may have or end up using other test suites
> mkdir tests/cypress
> cd tests/cypress

Simple npm install
> npm install cypress --save-dev

run Cypress
> npx cypress open

Official docs Install Cypress


Organization
While the install of Cypress creates an example skeleton directory
test/cypress/cypress
It is recommended to create your own directory 'just in case' a npm update decides to do 'something' with those skeleton directories.

create an app or unique name under
tests/cypress/[app_abbrev]
You can copy from
tests/cypress/cypress
or create the directories:

  • integration
where you write and run tests 
  • fixtures
static data for testing
  • plugins
enable you to modify or extend Cypress
  • screenshots
if taken, storage
  • support
loaded automatically before your test files ie global tests configuration
    • commands
additional grouping of common executed test steps
    • callbacks
additional grouping of callbacks which can modify the behaviors of tests


Configuration
Under
tests/cypress
create three config files,
cypress.json
cypress.env.json
cypress.env.json.example

cypress.json contains global configuration related to Cypress
Add your [app_abbrev] location to the config:
{
"fixturesFolder": "[app_abbrev]/fixtures",
"integrationFolder": "[app_abbrev]/integration",
"pluginsFile": "[app_abbrev]/plugins",
"screenshotsFolder": "[app_abbrev]/screenshots",
"supportFile": "[app_abbrev]/support"
}

cypress.env.json contains environment dependent configuration, such as user names for logins
You should create and maintain a
cypress.env.json.example
with the available config options too
An example config:
{
"web_base_url": "http://app.dev.localhost:8088/",
"login_username": "This email address is being protected from spambots. You need JavaScript enabled to view it.",
"login_password": "randchars"
}

Note, while Cypress does have a baseUrl config option that can be added to cypress.json, doing so does not allow the url to change per environment/developer/tester. If you are using a defined centralized test environment, or defined containers, then this should not be an issue. But to allow the url the app uses during testing to vary between environment/developer/tester, you can add and use your own base url by adding it to cypress.env.json

So instead of
Cypress.config().baseUrl
You would use
Cypress.env("web_base_url")


Support
The index.js in support is called on every run of a test.
This is where you can add global tests configuration and behaviors
Note, for easier maintenance, try to keep functionality to one file.

Update
tests/cypress/[app_abbrev]/support/index.js
to contain
import './commands/login_ui';

import './callbacks/stop_on_failure';
import './callbacks/preserve_session';

Support Commands
An example of a common executed test step may be to log in to your app.

Login UI
support/commands/login_ui.js
Create and add the minimal steps to log into your app, which may look similar to:
// https://on.cypress.io/custom-commands
Cypress.Commands.add("login_ui", (email, password) => {
// minimal info to login via ui
cy.visit(Cypress.env("web_base_url"));
cy.url().should("include", "[app_abbrev]");

let el = cy.get('#login_form [name="username"]');
el.type(Cypress.env("login_username"));

el = cy.get('#login_form [name="password"]');
el.type(Cypress.env("login_password"));

el = cy.get('#login_submit');
el.click();
});

Note, instead of using your apps ui to log in for every test, you should create a token or api access to expedite the test

Now you can call the command using one consistent statement

describe("Select that Awesome Thing Test", () => {
describe("Can Login", () => {
it("Can login", () => {
cy.login_ui(Cypress.env("login_username"), Cypress.env("login_password"));
});
});
});

Support Callbacks/Behaviors

Stop on Failure:
support/callbacks/stop_on_failure.js
When on step of a test fails, it will often cause the next steps to fail.
So fail early so the problem can be found quicker.
Create and add
// after each test
// stop test after first failure
afterEach(function () {
if (this.currentTest.state === 'failed') {
Cypress.runner.stop()
}
});

Preserve Sessions:
support/callbacks/preserve_session.js
All tests are supposed to be isolated, so Cypress will often clean up your cookies.
While it would be nice if the cleanup happens after the first test, or the last test in a suite, the clean up will happen after a few tests, which can log you out of your app and make it seem like your app or the test are broken.
To persists your session, which is often stored in a session cookie, create and add:
// once before all tests
// preserve session cookie so don't get 'randomly' logged out after several specs
before(function () {
Cypress.Cookies.defaults({
preserve: ['your_sessionid_name']
});
});


Package.json
While you can run Cypress via
> npx cypress open

You can also add a more common alias to your package.json
"scripts": {
"test": "npx cypress open"
},

And run Cypress via
> npm run test


.gitignore
Update your .gitignore
/tests/cypress/node_modules
/tests/cypress/cypress
/tests/cypress/cypress.env.json


Hopefully the above information helps you setup and use Cypress in a more enjoyable and useful fashion.


-End of Document-
Thanks for reading

AWS S3 Lifecycle delete rules

Details
Published: 16 December 2020
  • aws
  • s3

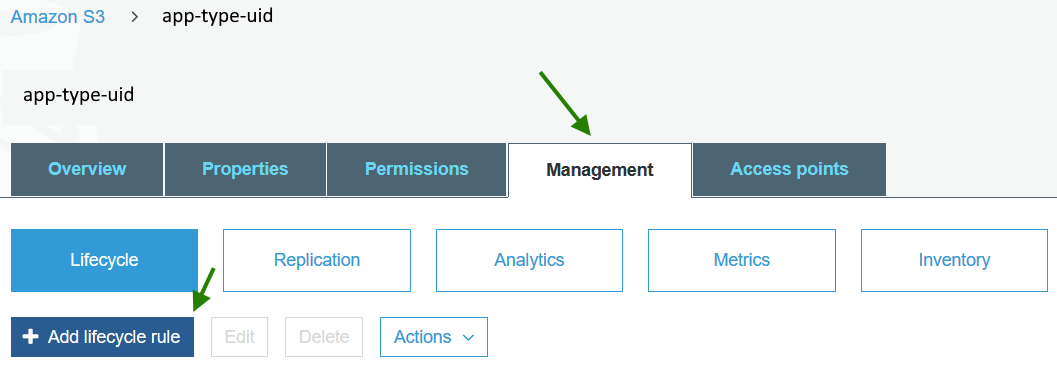
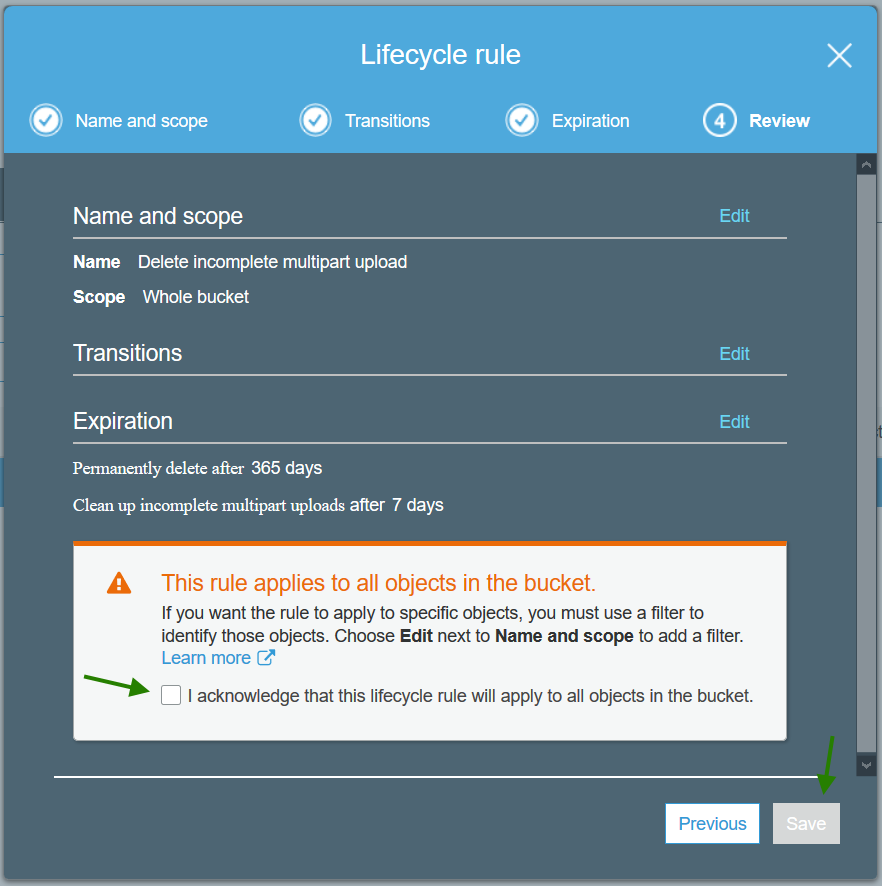
By putting a cleanup Lifecycle rule in place on your S3 buckets, you may be able to potentially save costs and increase LIST performance.

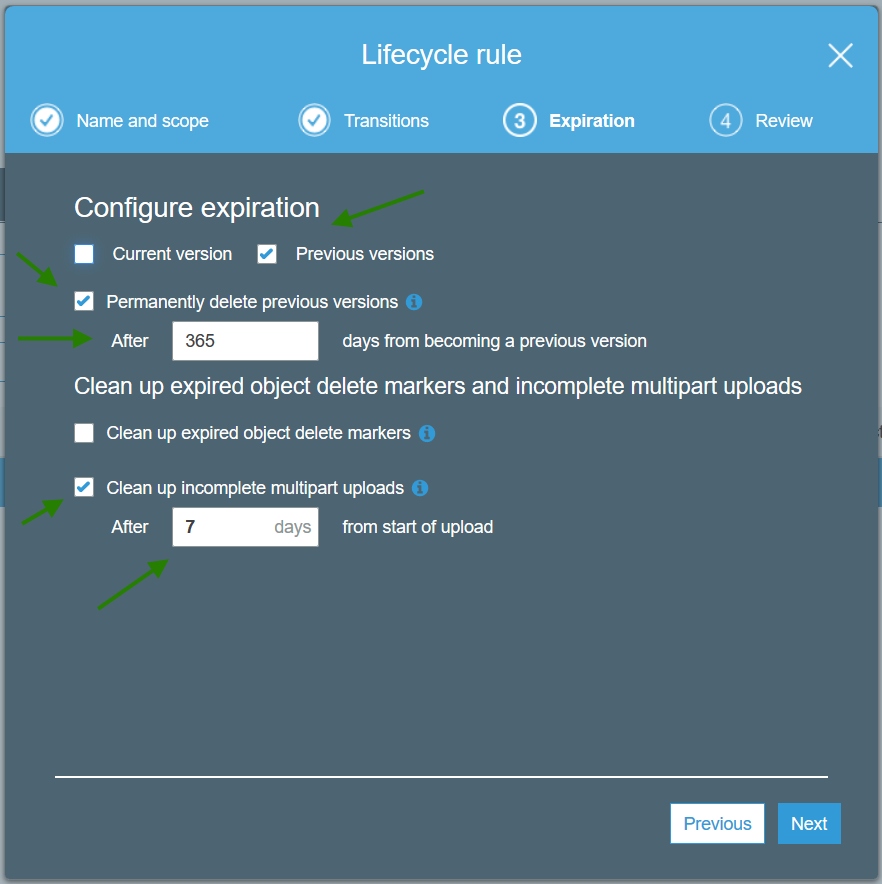
"Incomplete Multipart Uploads – S3’s multipart upload feature accelerates the uploading of large objects by allowing you to split them up into logical parts that can be uploaded in parallel.  If you initiate a multipart upload but never finish it, the in-progress upload occupies some storage space and will incur storage charges. However, these uploads are not visible when you list the contents of a bucket and (until today’s release) had to be explicitly removed.

Expired Object Delete Markers – S3’s versioning feature allows you to preserve, retrieve, and restore every version of every object stored in a versioned bucket. When you delete a versioned object, a delete marker is created. If all previous versions of the object subsequently expire, an expired object delete marker is left. These markers do not incur storage charges. However, removing unneeded delete markers can improve the performance of S3’s LIST operation."

Source: https://aws.amazon.com/blogs/aws/s3-lifecycle-management-update-support-for-multipart-uploads-and-delete-markers/


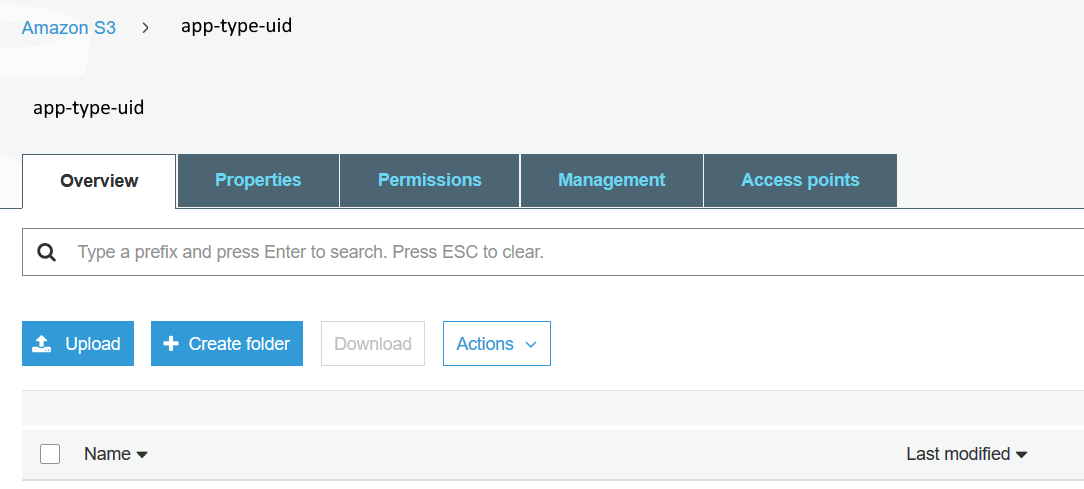
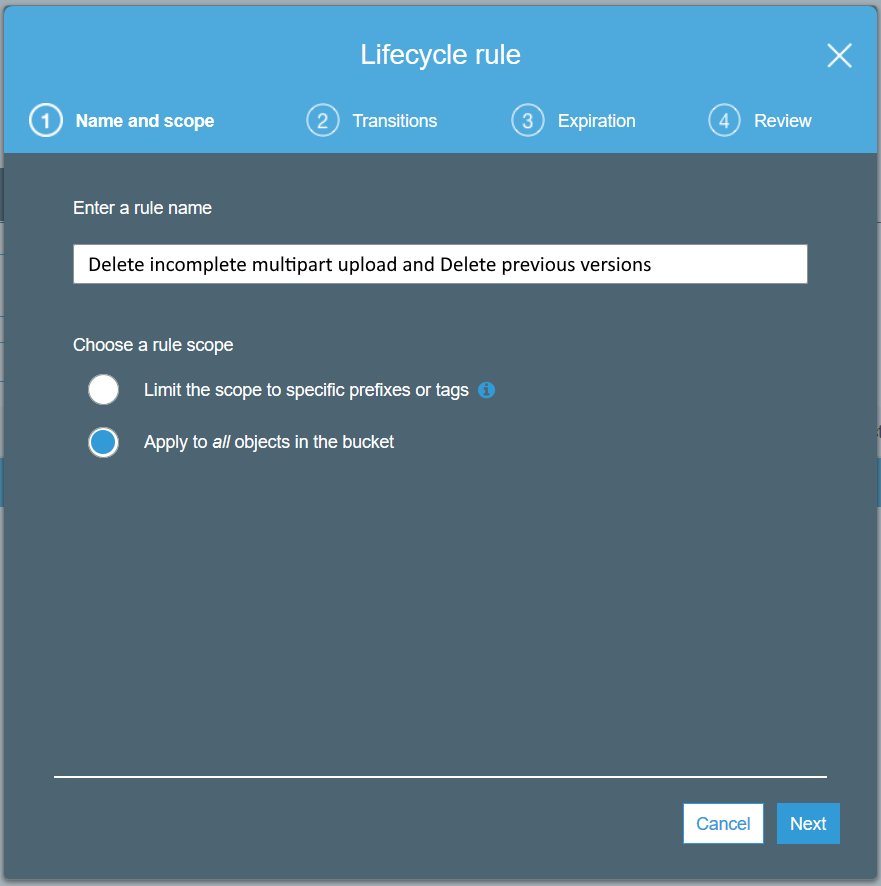
To add a cleanup Lifecycle rule:

  • Log into the Amazon S3 web console
  • Select your S3 bucket


  • Select Management
  • Select Add lifecycle rule


  • Enter a name such as 

'Delete incomplete multipart upload and Delete previous versions'


  • Skip Transitions for now

Transitions allow you to move storage to slower locations at a reduced cost
https://docs.aws.amazon.com/AmazonS3/latest/dev/lifecycle-transition-general-considerations.html


  • Expiration
    • Delete Previous versions after 365 days

You can choose shorter periods such as 7 days or 30 days if you don’’t have a use case for retrieving prior S3 versions.
You will still have the current version, which is usually all you want, but deleting previous versions can help with costs and S3 LIST performance.

    • Clean up incomplete multipart uploads after 7 days

If you do not have any automated processes that may re-try uploads, you could choose 1 day


  • Review

Agree to the 'scary' this applies to all objects in bucket
Note, if you have S3 objects (uploads) which require different policies, you may find it easier to manage by creating a S3 bucket per policy.


You now have some basic cleanup of your S3 bucket(s) configured.


-End of Document-
Thanks for reading
  1. PHP code quality using Code Sniffer
  2. Git Feedback Branches

Page 7 of 21

  • 2
  • 3
  • 4
  • 5
  • 6
  • 7
  • 8
  • 9
  • 10
  • 11

Search

Tags

php 21 git 10 windows 10 aws 9 nodejs 7 security 6 virtualbox 6 android 5 portable 4 redhat 4 ubuntu 4 react native 3 reactjs 3 docker 3 devops 3 nginx 3 bash 3 symfony 3 apache 3 ide 2

Most Read Posts

  • Handle HTTP 302 response from proxy in Angular
  • PHPUnit exceeds memory limit
  • Adding camera api to react native
  • Portable Java
  • Clear out old MSMQ messages

Older Posts

  • HDMI and Display Port versions
  • Useful Linux Commands
  • DevOps SysAdmin Tips for researching a slow or unresponsive app or system
  • DDEV for local development in containers
  • Valid local self signed certs
  • Bash script to delete merged local git branches
My Blog