Blog
- Details
DDEV
"DDEV is an open source tool for launching local [PHP, Python, NodeJS, etc] development environments in minutes. These environments can be extended, version controlled, and shared, so you can take advantage of a Docker workflow without Docker experience or bespoke configuration. Projects can be changed, powered down, or removed just as easily as they’re started."
GitHub | Docs
Terminology:
- host os (windows/macosx/linux)
- docker os (linux vm)
- containers (linux)
General flow of ddev tech stack
[ddev, on host os] -> [docker compose -> docker, in linux vm] -> [containers, linux, managed by docker]
Install DDEV and related tools
Follow the install steps for your OS
https://ddev.readthedocs.io/en/stable/
Before running any external shell or powershell scripts, read the install script for your OS.
Prerequisites:
Windows
- Recommended: use wsl2 and docker desktop, docker ce inside wsl (do your work mostly in windows)
- Alternative: use wsl2, docker ce inside wsl (do your work mostly in wsl/linux)
- Alternative: use virtual box, docker ce inside virtual box (do your work mostly in virtual box/linux)
Windows ides can access files in wsl2, but ide operations will be slower due to the different filesystems. Within wsl, for performance, do not reference files by /mnt/c/home/dev, instead use the linux file system, eg /home/dev or ~/
Install, update wsl
https://learn.microsoft.com/en-us/windows/wsl/install
https://learn.microsoft.com/en-us/windows/wsl/basic-commands
The ddev install uses chocolatey, a package manager for windows https://community.chocolatey.org/
Tip: Before installing ddev, you may want to change the default chocolatey tools install directory.
By default chocolatey installs itself to C:\ProgramData\chocolatey and installs tools to C:\tools\ (not great)
In an admin powershell, run:
[System.Environment]::SetEnvironmentVariable('ChocolateyToolsLocation','C:\ProgramData\ChocolateyTools', 'User')
Installing docker desktop may require a logout/reboot.
Ensure docker desktop is using wsl2, launch docker desktop
configure gear icon -> general -> use wsl2 based engine; resources -> wsl integration
You shouldn't need to directly access docker desktop when using ddev.
MacOSX
- Recommended: use colima, docker ce inside colima linux os (do your work mostly in macosx)
- Alternative: use docker desktop, docker ce inside docker desktop linux os (do your work mostly in macosx)
- Alternative: use virtual box, docker ce inside virtual box (do your work mostly in virtual box/linux)
You shouldn't need to directly use colima when using ddev.
Linux
- Recommended: docker ce
- Alternative: use docker desktop
DDEV Configuration
local config
a local config file can be used to merge with the main ddev config in .ddev/config.yaml
examples:
.ddev/config.local.yaml
hooks:
post-start:
- exec-host: echo -e "checking bootstrapping via \033[1;34mhttp://${DDEV_HOSTNAME}/ping\033[0m"
- exec-host: curl http://your-repo.ddev.site/ping
- exec-host: echo -e ""
ddev generated files
useful to see the docker config created by ddev.
do not edit as they will be re-generated on next start
.[dot folders]
.ddev-docker-compose-base.yaml
.ddev-docker-compose-full.yaml
Related DDEV Utilities
mkcert
mkcert is a simple tool for making locally-trusted development certificates. eg allows local https without browser warnings
https://github.com/FiloSottile/mkcert
firefox
The non chrome browser
https://www.mozilla.org/en-US/firefox/new/
for ssl access to ddev sites, import the mkcert generated ca cert
- list CA location, > mkcert -CAROOT
- in firefox url, about:preferences#privacy
- filter, certificates
- View Certificates -> Authorities -> Import
- Select the rootCA.pem file
- find the imported cert in the list, find mkcert
- click Edit Trust, click enable for websites
ngrok
ngrok is a reverse proxy that creates a secure tunnel from a public endpoint to a locally running web service eg expose a local server behind a NAT or firewall to the internet
https://ngrok.com/
chocolatey
a package manager for windows
- opensource https://community.chocolatey.org/
- install https://chocolatey.org/install
- gui https://docs.chocolatey.org/en-us/chocolatey-gui/setup/installation
docker
container management docker ce is opensource, docker desktop is a subscription
https://docs.docker.com/engine/install/ubuntu/
mutagen
mutagen provides real-time file synchronization and flexible network forwarding for developers, extending the reach of local development tools to cloud-based containers and infrastructure. initial file sync can take a bit https://mutagen.io/
maxosx and windows:
Accessing lots of files between the host os and linux os can be slow due to the different filesystems. mutagen will perform a two-way sync between your os and the ddev managed docker container.
https://ddev.readthedocs.io/en/stable/users/install/performance/#mutagen
traefik
dddev routing ddev-router has been based on a forked, poorly-documented nginx reverse proxy. Versions after DDEV v1.21.3 add a new router based on the popular Traefik Proxy.
https://ddev.readthedocs.io/en/latest/users/configuration/experimental/#traefik-router
https://traefik.io/traefik/
podman
container management, opensource, compatible with docker
https://podman.io/
phpstorm
php, code ide
https://www.jetbrains.com/phpstorm/
a ddev plugin exists for phpstorm and webstorm, which can facilitate setting up xdebug, server, php config, stop/start ddev, etc
https://ddev.readthedocs.io/en/latest/users/install/phpstorm/#phpstorm-basic-setup-on-windows-wsl2
using ddev from the command line may be simpler and more consistent
vscode
code ide
https://code.visualstudio.com/
General ddev, docker, and container tips
- manage ddev within the host windows/macosx os, and if needed manage docker ce via the cli within the linux vm (wsl for windows)
- one container per repo
- changes inside container will not persist, as it is a container
- any changes need to be made outside of container (code), or to ddev config (container services, config)
- ddev configuration is stored in the relative directory .ddev/
- to facilitate ddev updates, try to keep config changes to a minimal
- start project
> ddev start
initial file sync can take a bit - stop project
> ddev stop - project details
> ddev status
> ddev describe - list docker images
inside linux host
> docker ps - show all projects
> ddev list - stop all containers
> ddev poweroff - restart a project
often used after making .ddev config changes
> ddev restart - ddev images are debian based
ssh into container to test or view config
reminder, changes inside container will not persist
> ddev ssh - control processes, php-fpm, nginx, node
ddev uses supervisorctl to control processes, as opposed to systemctl; inside linux host
> supervisorctl restart php-fpm
> supervisorctl restart nginx
note, if a process dies or attempts to restart several times due to bad config, the container will stop. - start npm run start command
> ddev npm run start - stop npm run start command
> ddev npm run stop - run phpstan
> ddev composer phpstan - view logs from host os
> ddev logs - view logs inside container
> ddev ssh
> vi [log]
> tail -f [log] - docker maintenance
Sometimes, either due to bad ddev, docker, wsl, comila, or normal config/docker changes, you may end up with unused, disconnected images, containers.
To clean up your system, and recover some storage; inside your linux host
> docker system prune - if ddev container won't start after config changes
Fix or revert config changes, then
> ddev restart
"generally removes most things that need to be removed"
> ddev poweroff
> ddev rm -a - if start multiple ddev containers at the same time, there may be port conflicts as they may try to grab the same 'random' or initial default port; either restart failed container, or add a pause between container starts
- check open ports in linux host
> ss -l
-End of Document-
Thanks for reading
- Details
While developing web sites/applications locally, to facilitate development, you often use a local host name, such as 127.0.0.1, localhost, site.local, example.test, or sub.company.local. While you can access the site/application using normal HTTP, sometimes the application is configured for secure HTTP i.e. HTTPS or you always want to force HTTPS no matter the environment (dev/qa/prod).
However, ‘made up’ local host names such as example.test, site.local, site.dev etc can not use an external ssl certificate, as they cannot be accessed remotely to verify authenticity by a certificate authority (CA). So typically one would create a self signed certificate. But over time, browsers have restricted the acceptance of self signed certificates, resulting in a less friendly or impossible developer workflow. So the next step would be to add your own CA to your local environment, but that can be tedious and error prone. Luckily, there is a utility which greatly simplifies the process, for linux, macos, and even windows - mkcert
“Using certificates from real certificate authorities (CAs) for development can be dangerous or impossible (for hosts like example.test, localhost or 127.0.0.1), but self-signed certificates cause trust errors. Managing your own CA is the best solution, but usually involves arcane commands, specialized knowledge and manual steps.
mkcert automatically creates and installs a local CA in the system root store, and generates locally-trusted certificates. mkcert does not automatically configure servers to use the certificates, though, that's up to you.”
https://github.com/FiloSottile/mkcert
To create a usable self signed ssl certificate using Windows, Nginx, and Laragon (a portable LAMP stack):
Download the latest mkcert for your OS (Windows in this case)
https://github.com/FiloSottile/mkcert/releases
mkcert-v1.4.4-windows-amd64.exe
Copy the file to a new dir
C:/laragon/bin/mkcert/
And rename to a generic mkcert.exe
Note, assuming you installed/extracted Laragon to C:/laragon
In a command window with Administrator Privileges (Run as Admin)
> cd C:\laragon\etc\ssl
Specify the destination of the CA cert
> mkdir C:\laragon\etc\ssl\mkcert
Set an temporary environment variable for mkcert to read
> setx CAROOT "C:\laragon\etc\ssl\mkcert"
By default, it would have be in you user directory
> C:\Users\<user>\AppData\Local\mkcert
Close the command window and re-open it so the environment variable can be read
In linux you might source ~/.bash_profile .. but windows
Test that the environment variable is indeed set
> cd C:\laragon\etc\ssl\
> echo %CAROOT%
C:\laragon\etc\ssl\mkcert
Create and install your local CA
> ..\..\bin\mkcert\mkcert -install
You will be shown a prompt warning you that you are doing what you want to do, add a local CA

After reading, Click Yes
Note, by default the CA key will be named rootCA-key.pem and the CA cert will be named rootCA.pem.
The names are hard coded in the project source main.go, if you want to compile the project.
You can view the CA via the Certificate Manager
Start Menu -> Run -> certmgr
Or
Laragon -> Menu -> Nginx -> Certificate Manager
Note, while Laragon does have its own CA which it can add, it does not seem to work with recent browser updates.
Click to Trusted Root Certification Authority -> Certificates
Scroll to find mkcert Computer\User@Computer>

Note, you can delete it if you want by Right Clicking on and select Delete
Now generate the SSL certificate, which will be signed by the CA you just added
> cd C:\laragon\etc\ssl
> ..\..\bin\mkcert\mkcert site.local "*.site.local"
Would create the SSL key and cert in C:\laragon\etc\ssl as
site.local+1-key.pem and site.local+1.pem
Rename the files, or specify names when creating:
> ..\..\bin\mkcert\mkcert -key-file company.localhost.key -cert-file company.localhost.crt company.localhost *.company.localhost
Which would match
company.localhost
site1.company.localhost
site2.company.localhost
Or more generically
> ..\..\bin\mkcert\mkcert -key-file dev.localhost.key -cert-file dev.localhost.crt dev.localhost *.dev.localhost
Which would match
dev.localhost
site1.dev.localhost
site2.dev.localhost
Note, most browsers do not support wildcards 2 levels deep ie don't use just localhost or test
Note, Chrome redirects use of the .dev tld to HTTPS, as Google now owns the official .dev tld. While using any domain name which you override in your /etc/hosts file should be ok, it is best to use a domain you actually own. But if that is not practical, .test, .local, .localhost are the often provided alternatives.
Edit you Nginx or Apache config to add the SSL cert and key, and reload
Using the default website in Laragon as a working example
C:\laragon\etc\nginx\sites-enabled\00-default.conf
listen 8443;
Server_name site1.dev.localhost;
# Enable SSL
ssl_certificate "C:/laragon/etc/ssl/dev.localhost.crt";
ssl_certificate_key "C:/laragon/etc/ssl/dev.localhost.key";
ssl_session_timeout 5m;
ssl_protocols TLSv1 TLSv1.1 TLSv1.2;
ssl_ciphers ALL:!ADH:!EXPORT56:RC4+RSA:+HIGH:+MEDIUM:+LOW:+SSLv3:+EXP;
ssl_prefer_server_ciphers on;
Note, if you are running another service on port 443, so choose another port, such as 8443.
Assuming you have added your local host name to /etc/hosts or
C:\Windows\system32\drivers\etc\hosts
127.0.0.1 site1.dev.localhost
Viewing https://site1.dev.localhost
Should result in a valid SSL cert.

Enjoy your HTTPS, and develop away.
To install reinstall on a computer, or reinstall after deleting the mkcert CA
Copy the full Laragon dir, or the rootCA.pem at least
Set an temporary environment variable for mkcert to read
> setx CAROOT "C:\laragon\etc\ssl\mkcert"
Close the command window, re-open
Create and install your local CA
> ..\..\bin\mkcert\mkcert -install
FireFox
Mkcert auto installs into chromium based browsers.
For FireFox, there are a few extra steps.
View where mkcert installed the CA certificate
> mkcert -CAROOT
in FireFox url, type in about:preferences#privacy
Filter options to ‘certificates’
click View Certificates -> Authorities -> Import
Select the rootCA.pem file, in the directory listed by the prior mkcert -CAROOT
The above used to be sufficient, for newer FireFox versions >= 112
There is an extra step to take
Within the certificate list, find the imported cert in the list; it will be in the middle listed under ‘mkcert’
Now click the Edit Trust button, and check ‘enable for websites’
Re-enjoy your HTTPS, and develop away.
-End of Document-
Thanks for reading
- Details
When using git, overtime, your local copies of branches can grow and become burdensome to search through. While you could manually delete 'old' branches, some of those branches may still be active eg not merged in yet. It would be nice to have a bash script which would find merged branches older than N days and delete them.
First, list branches merged
> git branch --merged
# https://git-scm.com/docs/git
Source: GitHub Gist
- Details
Instead of using console.logs, WebStorm can be used to debug your development builds of your React app. You can set breakpoints, and inspect your apps in real-time, greatly expediting and simplifying your debug experience.
WebStorm is an integrated development environment for JavaScript and related technologies. Like other JetBrains IDEs, it makes your development experience more enjoyable, automating routine work and helping you handle complex tasks with ease.
source: https://www.jetbrains.com/webstorm/
React is a declarative, efficient, and flexible JavaScript library for building user interfaces. ReactJS is an open-source, component-based front-end library responsible only for the view layer of the application. React is used to create modular user interfaces. It promotes the development of reusable UI components that display dynamic data.
source: https://www.geeksforgeeks.org/react-js-introduction-working/
source: https://react.dev
How To:
Open WebStorm, configure a JavaScript debugger
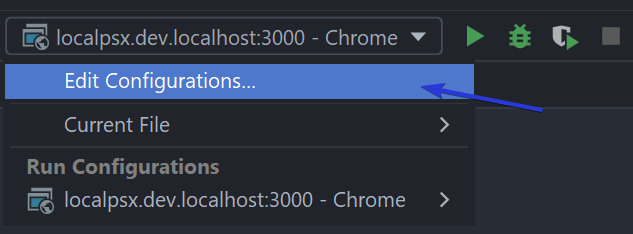
Run -> Edit Configurations
or
Click the drop down near the run/debug icons, select Edit Configurations
Add a new configuration, click the + button
Choose JavaScript Debug
Change the url to match your development environment, often localhost:3000
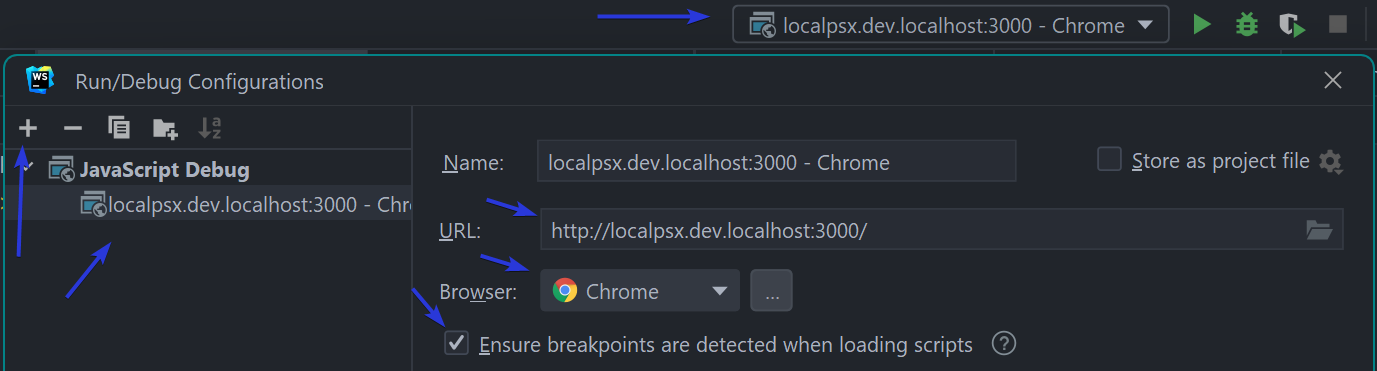
Save
Click the Debug icon, the green bug button, next to the green play button
WebStorm by default will launch a new Chrome instance
However, it will not have any of your plugins.
You can re-install all your plugins, or better, edit the browser configuration in WebStorm
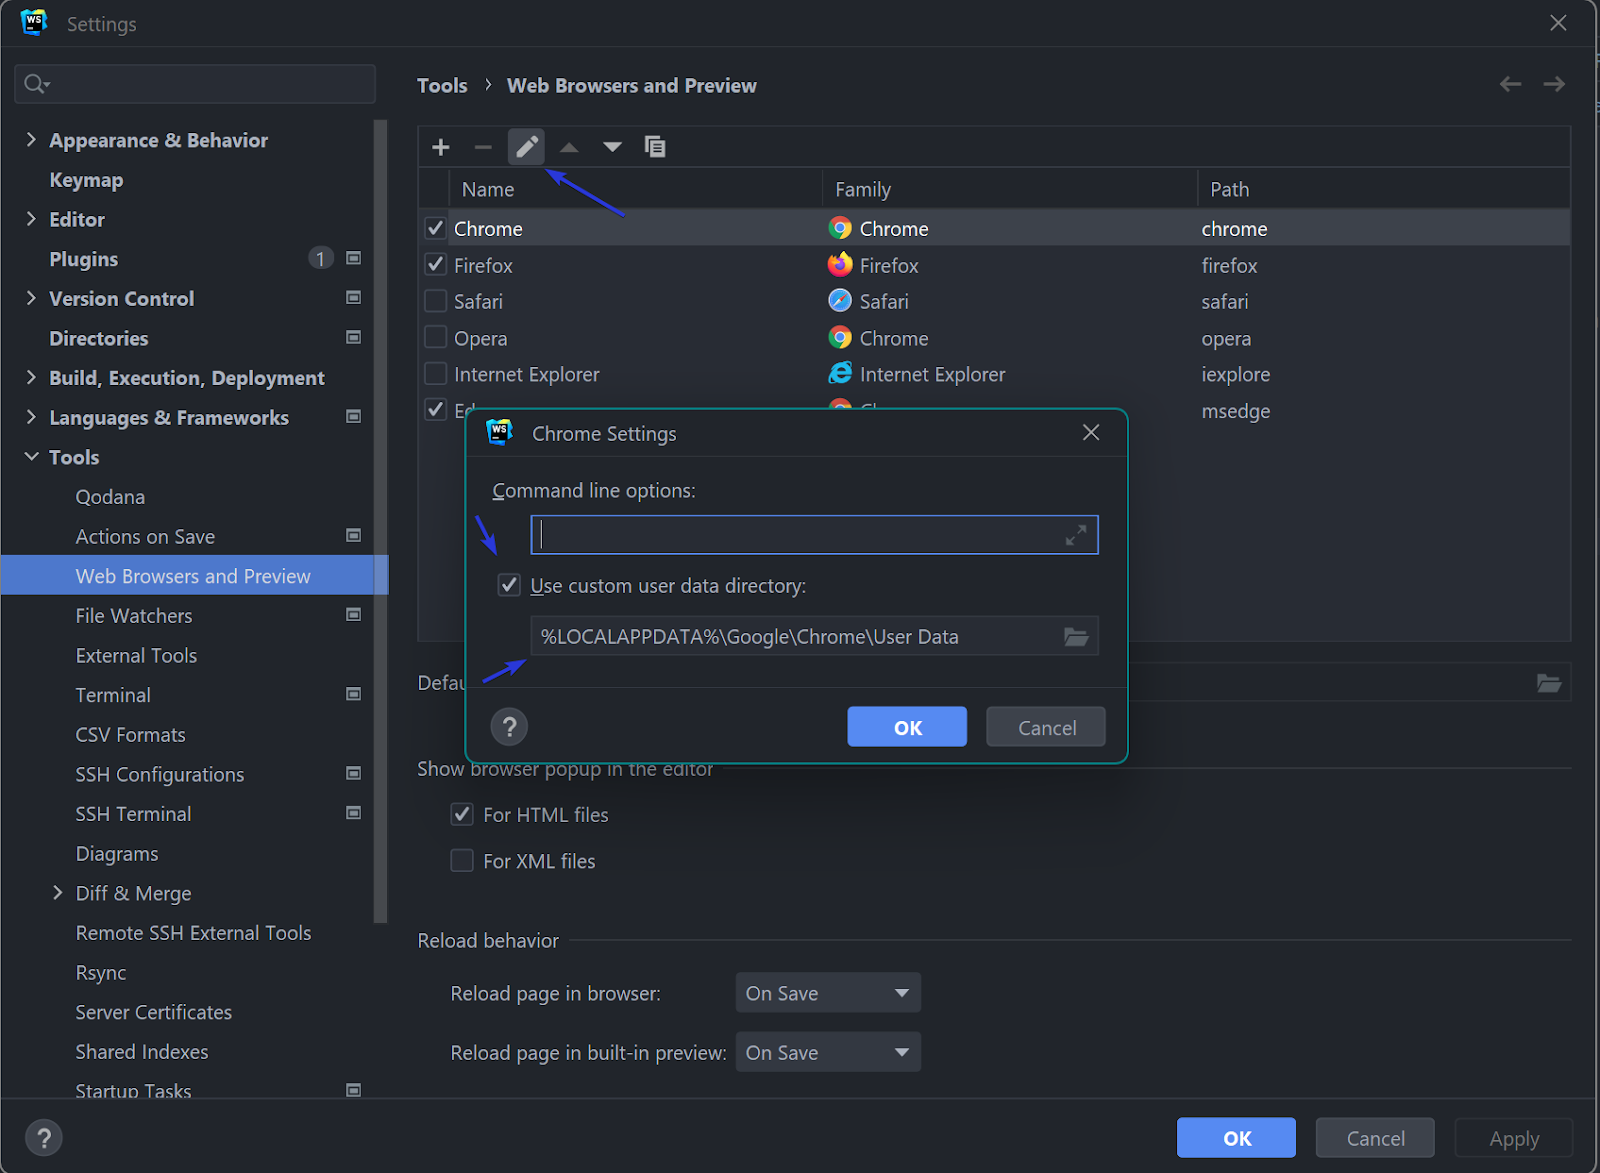
Customize browser config
File -> Settings -> Tools -> Web Browsers and Preview
Edit Chrome
Enable Use custom user data dictionary, and past in the path to your Chrome user data directory
Windows %LOCALAPPDATA%\Google\Chrome\User Data
Mac OSX ~/Library/Application Support/Google/Chrome
Linux ~/.config/google-chrome
source: https://chromium.googlesource.com/chromium/src/+/master/docs/user_data_dir.md#Windows
Additional information from WebStorm
source: https://blog.jetbrains.com/webstorm/2017/01/debugging-react-apps/
-End of Document-
Thanks for reading