Blog
- Details
you many run into memory limits when you run a large number of tests.
With PHPUnit 4.8, you can add some extra code to clear out the variables you created during each test, thus saving some memory.
class YourTestCase extends WebTestCase
{
  protected function tearDown()
  {
     echo 'pre reduce memory usage: '.sprintf('%.2fM', memory_get_usage(true)/1024/1024);
     // reduce memory usage

    // get all properties of self
    $refl = new \ReflectionObject($this);
    foreach ($refl->getProperties() as $prop) {
       // if not phpunit related or static
       if (!$prop->isStatic() && 0 !== strpos($prop->getDeclaringClass()->getName(), 'PHPUnit_')) {
         // make accessible and set value to to free memory
         $prop->setAccessible(true);
         $prop->setValue($this, null);
       }
   }
   echo 'post reduce memory usage: '.sprintf('%.2fM', memory_get_usage(true)/1024/1024);

   parent::tearDown();
}
Reference
https://stackoverflow.com/questions/13537545/clear-memory-being-used-by-php
Note:
Using unset($this) or unset($var) does not immediately free the variable from memory. However, setting $this = null or $var = null immediately assigns the value null, which uses less memory than the object, string, or other value that was set. You could also use the value of 0 or "" or anything really, just null is short and sweet and infers the intent of the value being unset.
Related extra
You can also increase the allowed memory usage in your test.
class YourTestCase extends WebTestCase
{
   public function setUp()
   {
       ini_set('memory_limit', '512M');

       parent::setUp();
   }
}
End of document. Thanks for reading.
- Details
- try 1
this will update all packages and their dependencies, plus updating the lock file
note:
you can pin you main dependencies with exact versions
ie 2.8 instead of ~2 or ^2 or @dev (eek!)
- try 2
--lock: only updates the lock file hash
but actually, this will update dependencies too, which are not version pinned
- try 3
--lock: Only updates the lock file hash
--root-reqs: Restricts the update to your first degree dependencies
and since your first degree dependencies are version locked, right?
only the lock file gets updated.
task accomplished.
End of document. Thanks for reading.
- Details
"The comprehensive camera module for React Native. Including photographs, videos, and barcode scanning!"
Sounds cool, and the installation looks to be easy going by the instructions at
https://github.com/react-native-community/react-native-camera
Note: This guide assumes you have already built a basic react native app using
> create-react-native-app dev-app-01
or whatever cooler name you gave your app
and you want to add camera functionality to prototype an app
And you have set up your node js, react native, android sdk environment, and ejected your react native app; if not you can follow the guide Eject your react native app!
And the adventure begins:
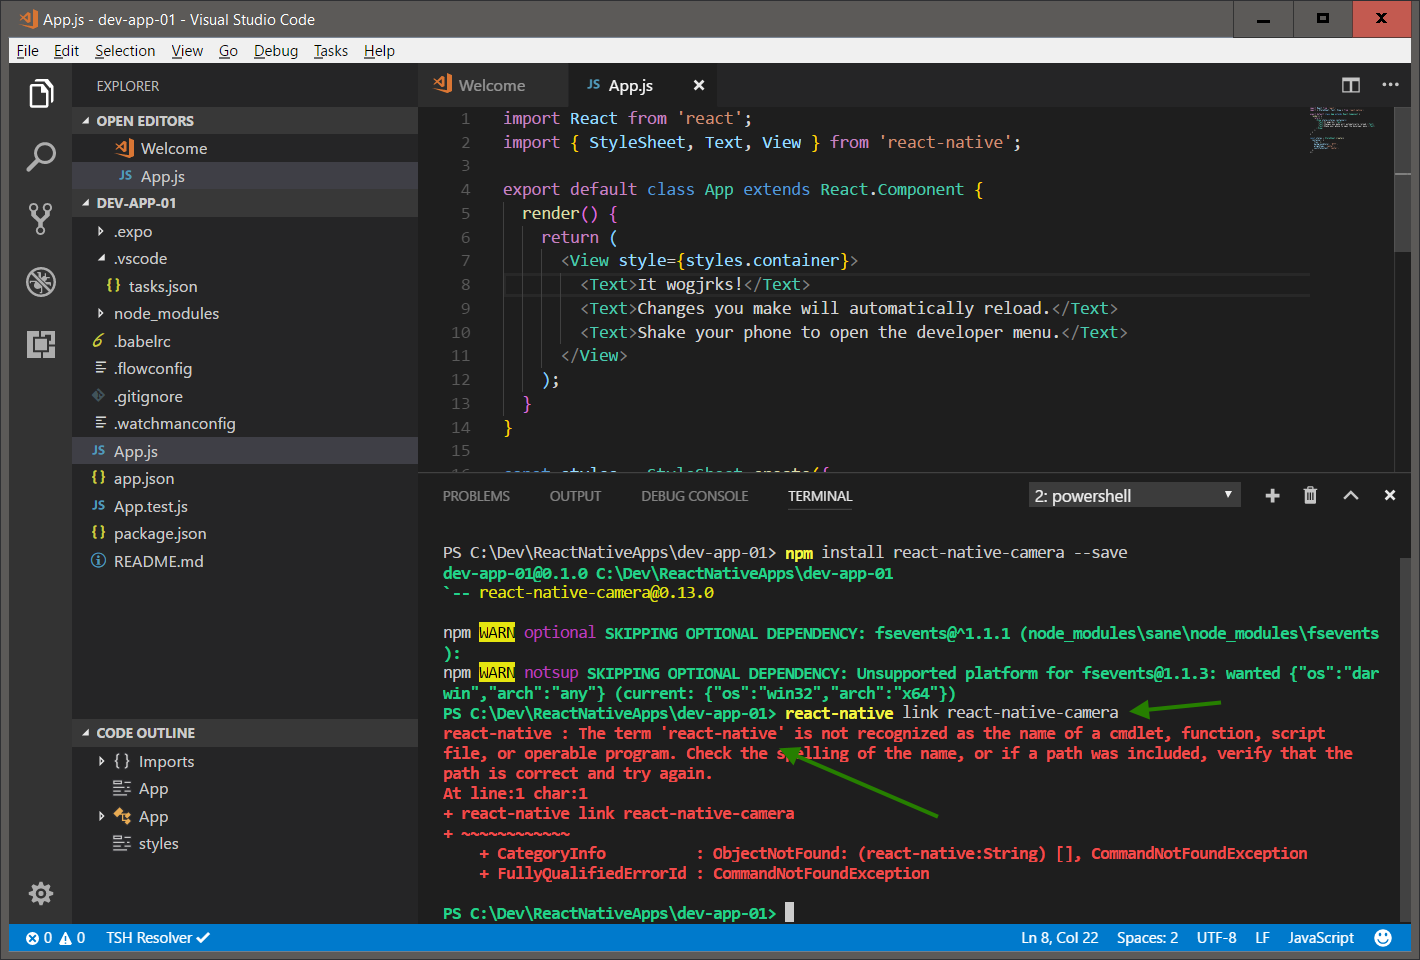
> npm install react-native-camera --save
That should work
> react-native link react-native-camera

Try running it
> react-native run-android
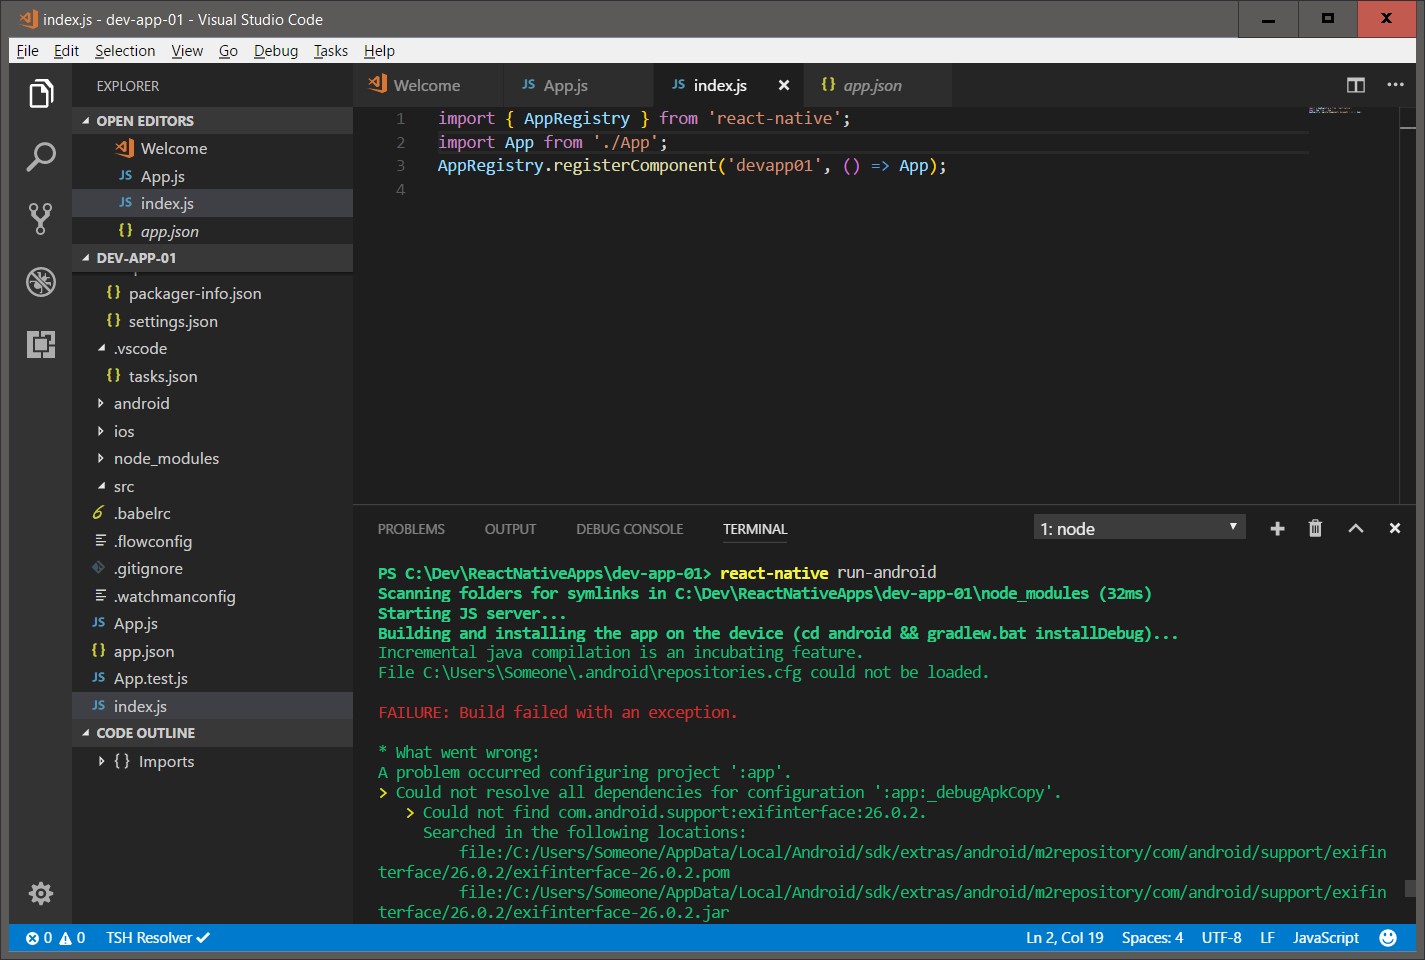
And the first Error #1
File C:\Users\[username]\.android\repositories.cfg could not be loaded.
To confirm that the automatic install and link methods did the right things,read over the manual instructions to install on android (repeated below)
https://github.com/react-native-community/react-native-camera#android
Note: I had to perform steps 5 and 6; Steps 1 through 4 were done by the link command
1. > npm install react-native-camera --save
2. Open up `android/app/src/main/java/[...]/MainApplication.java
Add import com.lwansbrough.RCTCamera.RCTCameraPackage; to the imports at the top of the file
Add new RCTCameraPackage() to the list returned by the getPackages() method.
Add a comma to the previous item if there's already something there.
3. Append the following lines to android/settings.gradle:
include ':react-native-camera'
project(':react-native-camera').projectDir = new File(rootProject.projectDir, '../node_modules/react-native-camera/android')
4. Insert the following lines inside the dependencies block in android/app/build.gradle: c
ompile project(':react-native-camera')
5. Declare the permissions in your Android Manifest (required for video recording feature)
<uses-permission android:name="android.permission.RECORD_AUDIO"/>
<uses-permission android:name="android.permission.READ_EXTERNAL_STORAGE" />
<uses-permission android:name="android.permission.WRITE_EXTERNAL_STORAGE" />
6. Add jitpack to android/build.gradle
allprojects {
repositories {
maven { url "https://jitpack.io" }
}
}
Try running again
> react-native run-android
And the same Error #1
File C:\Users\[username]\.android\repositories.cfg could not be loaded.
So create an empty file C:\Users\[username]\.android\repositories.cfg

Note: Make sure you already have the android emulator running
Open Android StudioTools -> Android -> ADV Manager aka Android Virtual Device -> Start
Try running again
> react-native run-android
And Error #2
> Could not resolve all dependencies for configuration ':app:_debugApkCopy'.
> Could not find com.android.support:exifinterface:26.0.2.
Manually add the dependencies to add the missing libs
Browse to c:\Dev\ReactNativeApps\dev-app-01\android\app\build.gradle
And add the dependencies
dependencies {
compile 'com.android.support:exifinterface:26.0.2'
compile "com.android.support:support-v4:26.0.1"
compile fileTree(dir: "libs", include: ["*.jar"])
compile "com.android.support:appcompat-v7:23.0.1"
compile "com.facebook.react:react-native:+"
compile project(':react-native-camera')
}
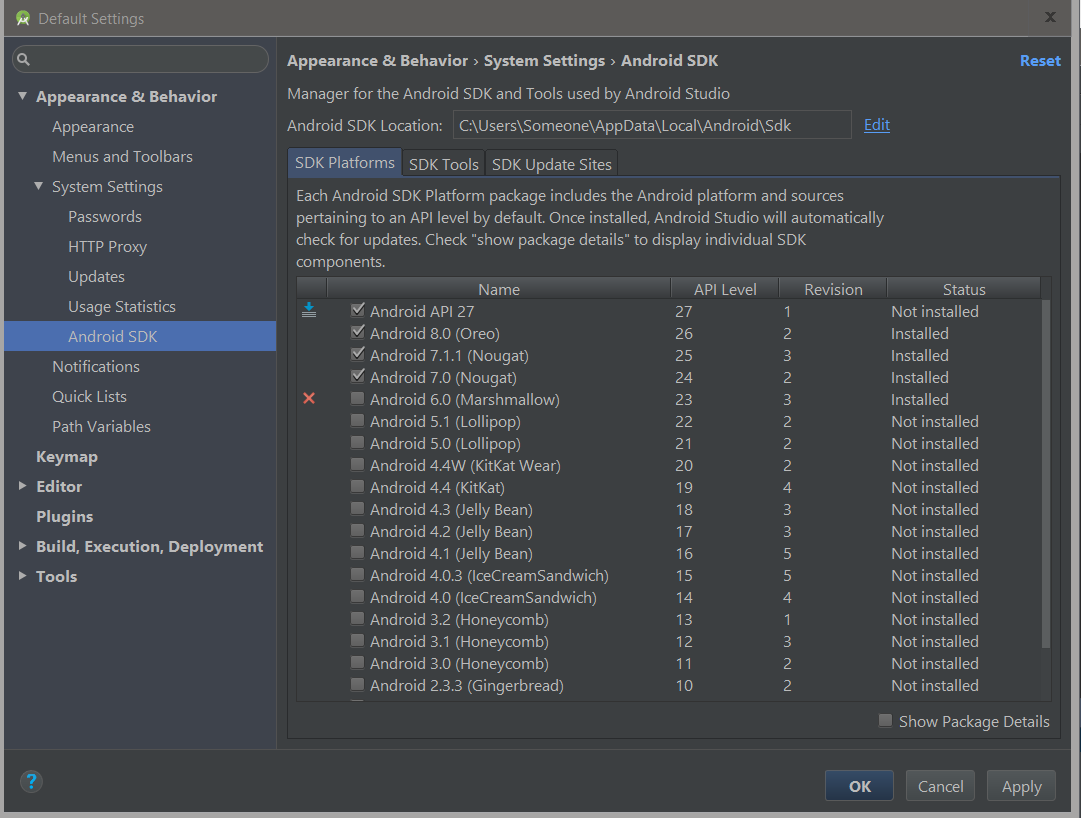
To add it
Open Android StudioTools -> Android -> SDK Manager
Ensure the latest android versions are enabled, and save
Try running again
> react-native run-android
And again Error #2
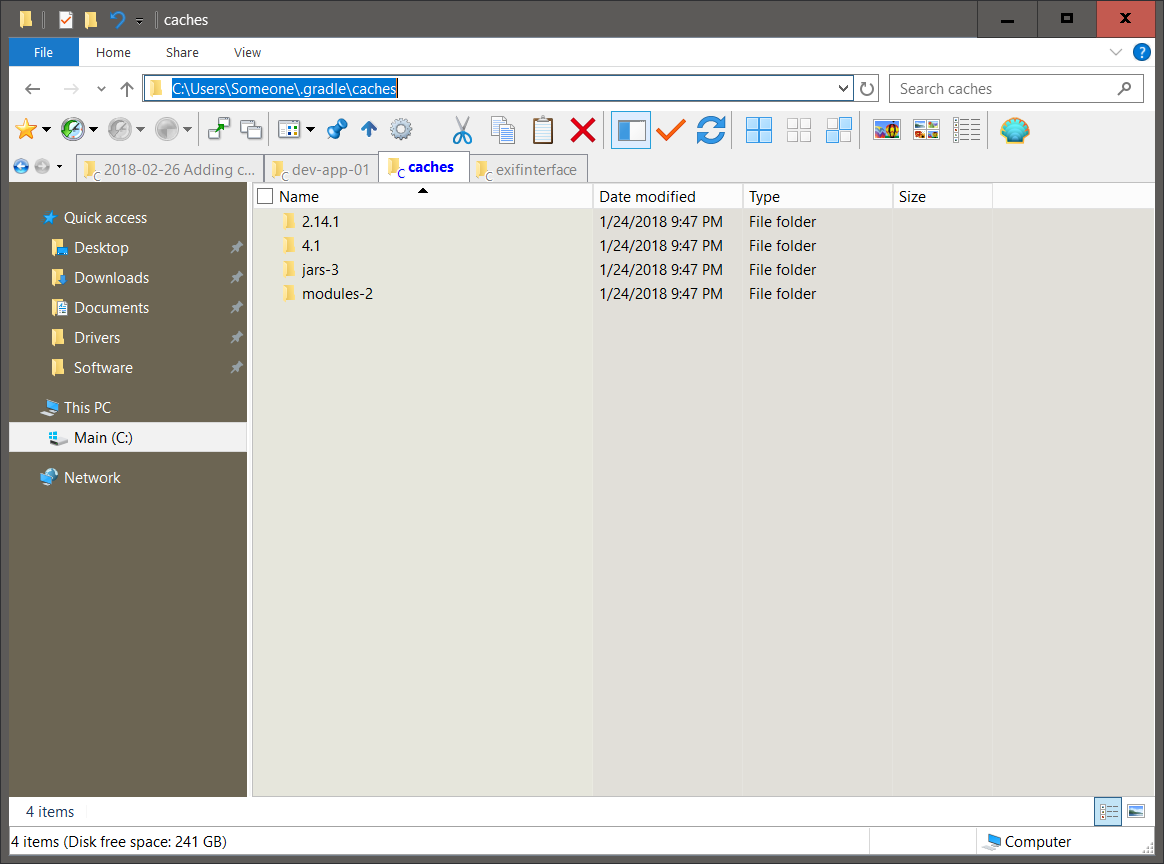
You can also delete the gradle cache which may be stale from the manual android instructions above
Navigate toC:\Users\[username]\.gradle\caches
And delete all folders
Note: Gradle is a build system used by Google for androidGradle is similar in concept to Maven, Composer, Npm, Make, etc
Try running again
> react-native run-android
React native via gradle will re-download all the required java packages that are set in the build.gradle
And again Error #2
Well, let’s look at the build.gradle file on GitHub for the camera project
https://github.com/react-native-community/react-native-camera/blob/master/android/build.gradle
Ok, the repositories and dependencies sections are different from the main documentation.
Let’s try them
repositories {
mavenCentral()
maven { url 'https://maven.google.com' }
maven { url "https://jitpack.io" }
}
dependencies {
compile 'com.facebook.react:react-native:+'
compile "com.google.zxing:core:3.2.1"
compile "com.drewnoakes:metadata-extractor:2.9.1"
compile 'com.google.android.gms:play-services-vision:+'
compile "com.android.support:exifinterface:26.0.2"
compile 'com.github.react-native-community:cameraview:df60b07573'
}

Try running again
> react-native run-android
And Error #3
> Manifest merger failed :
Attribute meta-data#android.support.VERSION@value value=(26.0.2) from [com.android.support:exifinterface:26.0.2] AndroidManifest.xml:25:13-35
is also present at [com.android.support:support-v4:26.0.1] AndroidManifest.xml:28:13-35 value=(26.0.1).
Suggestion: add 'tools:replace="android:value"' to <meta-data> element at AndroidManifest.xml:23:9-25:38
to override.
Going by the Q&A section of the documentation
https://github.com/react-native-community/react-native-camera#q--a
Comment out the dependency
compile 'com.google.android.gms:play-services-vision:+'
Try running again
> react-native run-android
And Error #4
Error: Cannot create directory C:\Dev\ReactNativeApps\DevApp02\android\app\build\intermediates\incremental\mergeDebugResources\merged.dir\values
Perhaps this exceeds window directory length
So navigate there and create it manually
C:\Dev\ReactNativeApps\DevApp02\android\app\build\intermediates\incremental\mergeDebugResources\merged.dir
Values
Try running again
> react-native run-android
And again Error #4
So try deleting the build folder
C:\Dev\ReactNativeApps\DevApp02\android\app\build\
Hmm .. back to Error #3
Going by the Q&A section of the documentation
https://github.com/react-native-community/react-native-camera#q--a
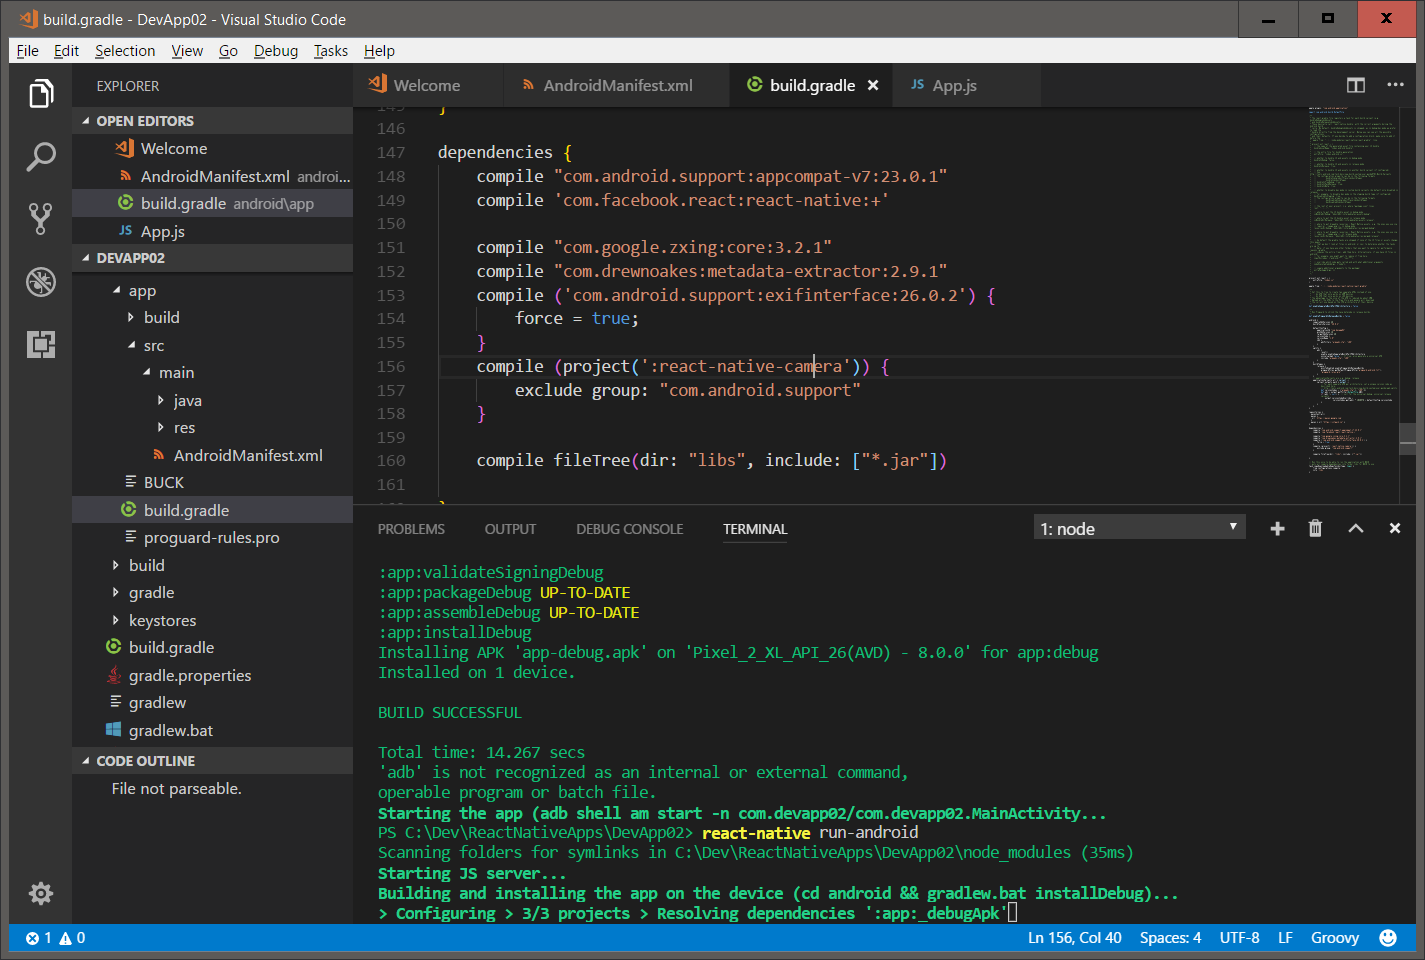
exclude group: "com.android.support"And force exifinterface:26.0.2
repositories {
mavenCentral()
maven { url 'https://maven.google.com' }
maven { url "https://jitpack.io" }
}
dependencies {
compile "com.android.support:appcompat-v7:23.0.1"
compile 'com.facebook.react:react-native:+'
compile "com.google.zxing:core:3.2.1"
compile "com.drewnoakes:metadata-extractor:2.9.1"
compile ('com.android.support:exifinterface:26.0.2') { force = true; } compile (project(':react-native-camera')) {
exclude group: "com.android.support"
}
compile fileTree(dir: "libs", include: ["*.jar"])
}
Try running again
> react-native run-android
Well, no console errors
So try to launch the basic default app .. and that now works again
Optimistic -sign-
Add the camera example code from the main doc
https://github.com/react-native-community/react-native-camera#usage
Try running again
> react-native run-android
And Error #5
The react native red screen
Instead of trying to debug that, let’s try using the example app checked into GitHub
https://github.com/react-native-community/react-native-camera/blob/master/RNCameraExample/App.js
Try running again
> react-native run-android
And Error #6
bundling failed: Error: Unable to resolve module `./assets/ic_photo_camera_36pt.png`

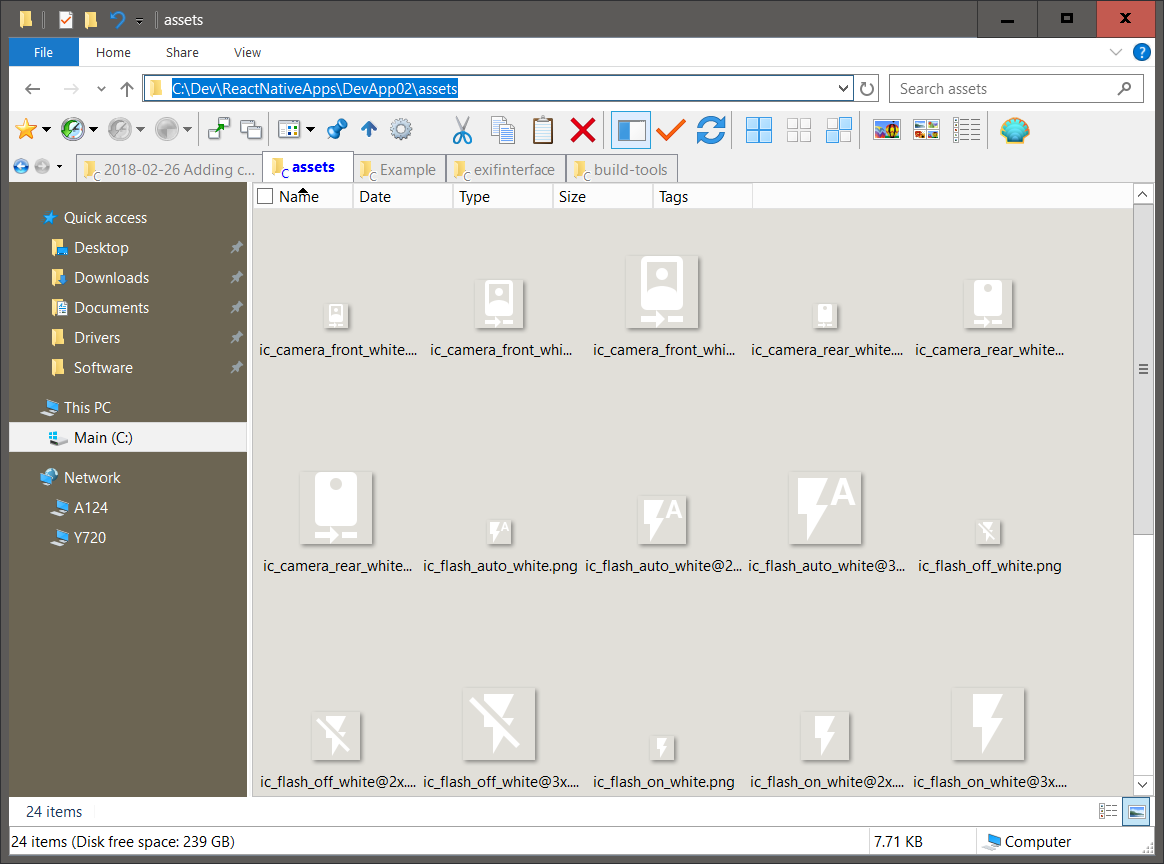
So browse the GitHub project, and there is an assets/ directory
Copy all those to your project
It is easier to git clone the project or download it as a zip and copy the assets/ folder over
https://github.com/react-native-community/react-native-camera
Try running again
> react-native run-android
And Error #7
cannot load index.android.js
Per a git issue thread
https://github.com/facebook/react-native/issues/15388
adb reverse tcp:8081 tcp:8081
Adb was not in my path, so I had to
C:\Users\[username[\AppData\Local\Android\sdk\platform-tools\adb reverse tcp:8081 tcp:8081
Try running again
> react-native run-android
And Error #8
A white screen
Trying another option in the git issue thread
https://github.com/facebook/react-native/issues/15388#issuecomment-356937491
Shake the phone -sign- to show developer options for react native
Choose Dev Settings
Tap Debug server host and port for device
Enter your laptops IP and port 8081
Note: You can get your IP from the command prompt
> ipconfig
Try running again
> react-native run-android

And hey, it actually works.
Cool.
There was a lot of environment initialization and fixing from the joys of rapid development libraries and multiple complex build tools, but at least the camera api is available and -currently- works.
Now to actually designing an app.
Till next time.
End of document. Thanks for reading.
- Details
Background:
While this started as a 'simple' guide to install a camera component in react native, it ends up being a guide to eject your react native app and run it in the android emulator, as preparation to using the camera component.
Note: This guide assumes you have already built a basic react native app using> create-react-native-app dev-app-01 or whatever cooler name you gave your app and you want to add camera functionality to prototype an app
Impetuous:
React Native has a native Camera component billed as
"The comprehensive camera module for React Native. Including photographs, videos, and barcode scanning!"
Sounds cool, and the installation looks to be easy going by the instructions at
https://github.com/react-native-community/react-native-camera
And the adventure begins:
> npm install react-native-camera --save
That should work
> react-native link react-native-camera
And the first Error #1
The term 'react-native' is not recognized
You need to install react native global
> npm install -g react-native-cli
And the next Error #2
`react-native link` can not be used in Create React Native App projects.
So let's go with the manual instructions at
https://github.com/react-native-community/react-native-camera
First, to use native components, you have to 'eject' your project
Ejecting just means you can use native java and objective c code and components in your app
> npm run eject
This will create android and ios folders where you can customize the java and objective c code directly, or in the case of trying to use the camera component, add components which are written in java and objective c
Answer a few questions such as what's your project name.
I choose to not create an Expo account at this time, as uhg another account, and their site was not responding tonight. While using the Expo app on your phone is easier than manually copying your app from your notebook to your phone, the android emulator should work for now for quick testing.
> npm start
And the next Error #3
will complain that you are running a react native app so now you have to start with android
trying again
> react-native run-android
And the next Error #4
SDK location not found. Define location with sdk.dir in the local.properties file or with an ANDROID_HOME environment variable.
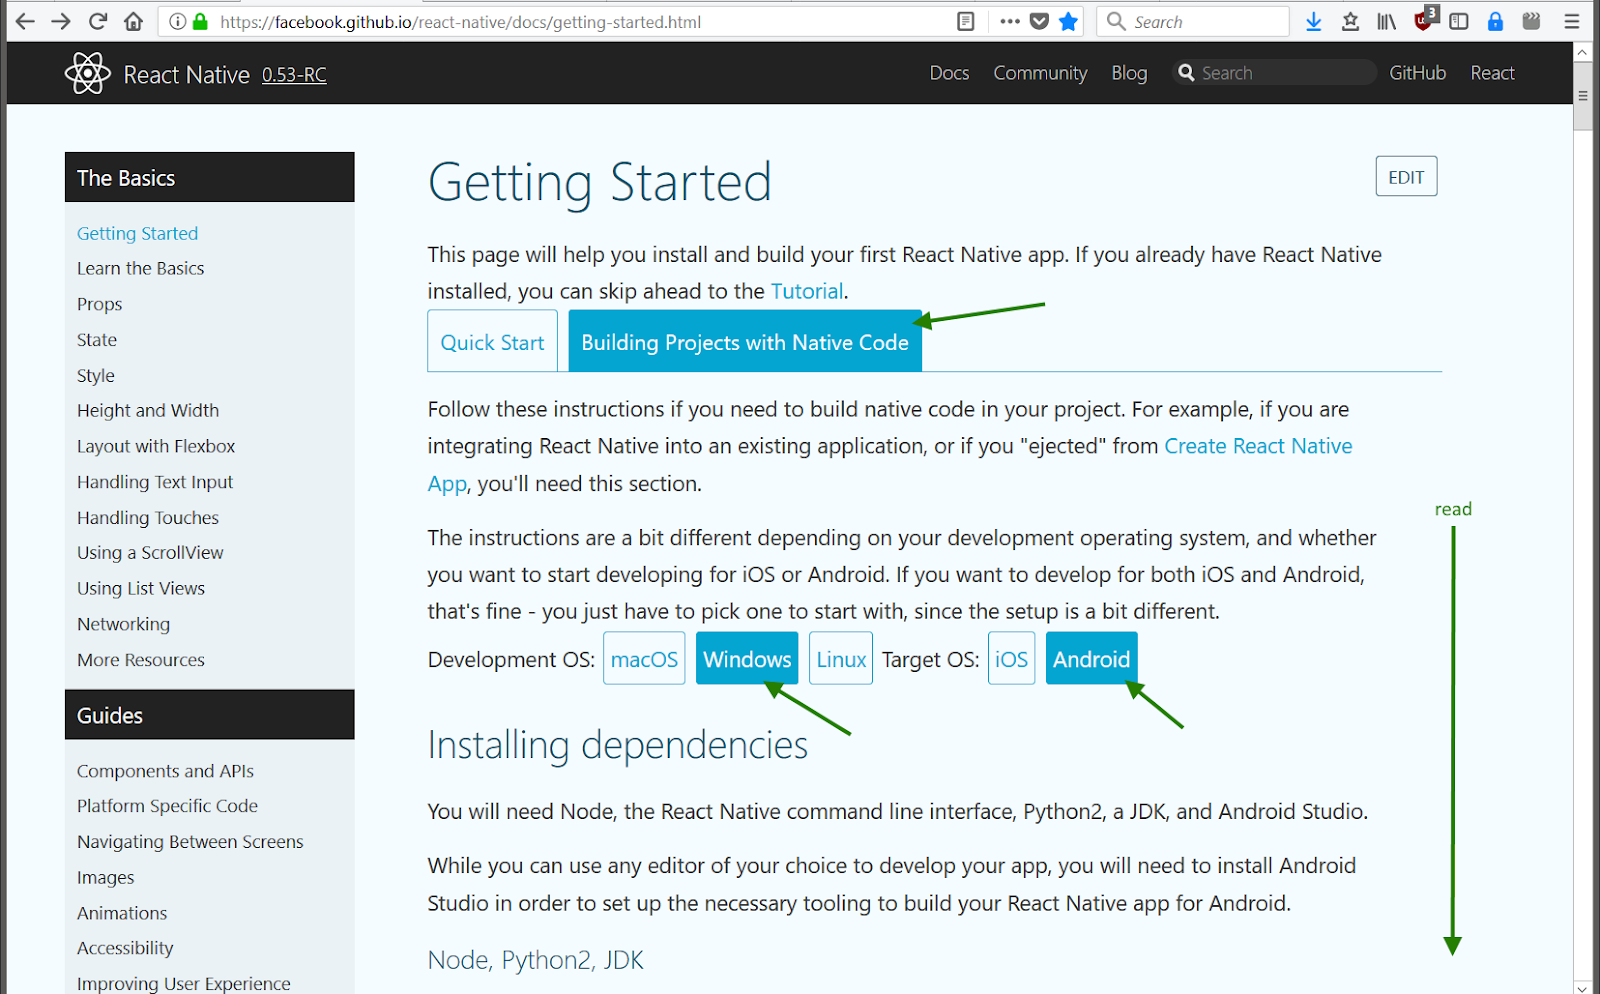
So now you have to install android studio to get the android sdkIt's best to follow the full page of instructions at
https://facebook.github.io/react-native/docs/getting-started.html
Make sure you click the appropriate buttons
'Building Projects with Native Code'
'Windows'
'Android'
And then follow their lengthy instructions.
- Download and install android studio (683MB + GBs for SDKs and emulators),
- Make sure you have the appropriate SDKs checked - the defaults worked for me
- And add a PATH variable
> react-native run-android
And the Error #4 again
SDK location not found. Define location with sdk.dir in the local.properties file or with an ANDROID_HOME environment variable.
Double check that you entered the PATH in Android Studio
But that still didn't work for me,
So I created a local.properties file in the android/ folder and added
> sdk.dir = C:/Users/[username]/AppData/Local/Android/sdk

trying again
> react-native run-android
And the next Error #5
Could not find tools.jar. Please check that C:\Program Files\Java\jre1.8.0_151 contains a valid JDK installation.
Which means you need to install the Java Development Kit aka JDK
Which makes sense as the java code will need to be compiled
Download and install the JDK
http://www.oracle.com/technetwork/java/javase/downloads/jdk8-downloads-2133151.html
trying again
> react-native run-android
And the next Error #6
com.android.builder.testing.api.DeviceException: No connected devices!
Which means the android emulator needs to be running
So, open Android Studio
Tools -> Android -> ADV Manager aka Android Virtual Device
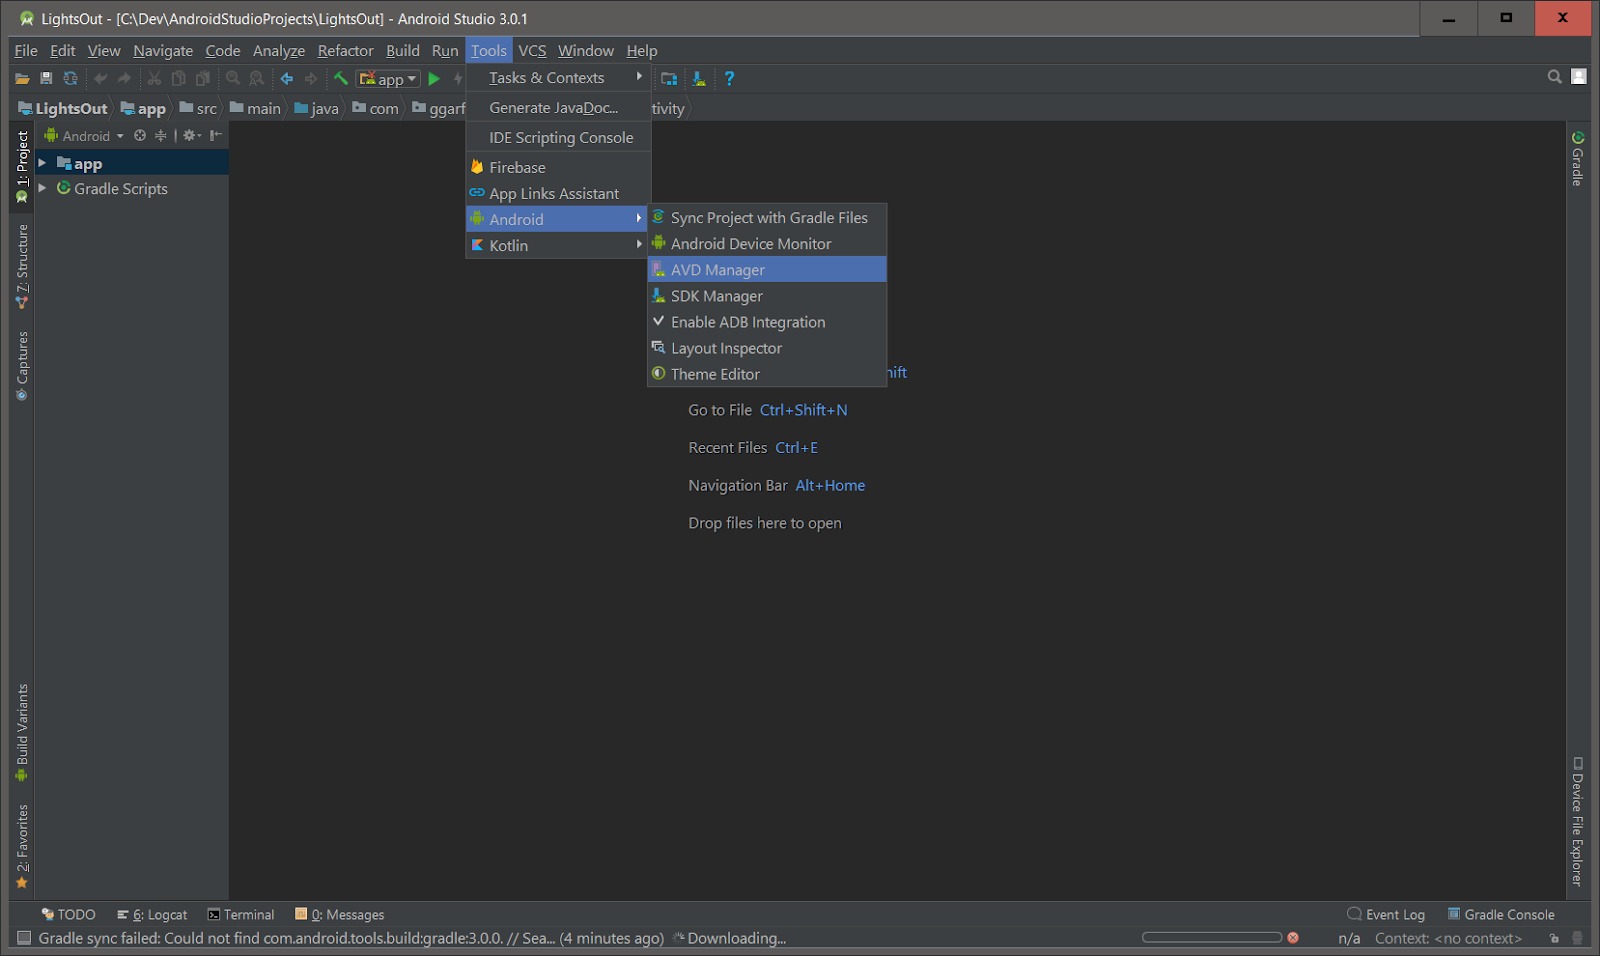
Create a new device
Choose Pixel 2 XL since that is fairly new
Next Next Next, just using the defaults

Click the Play button
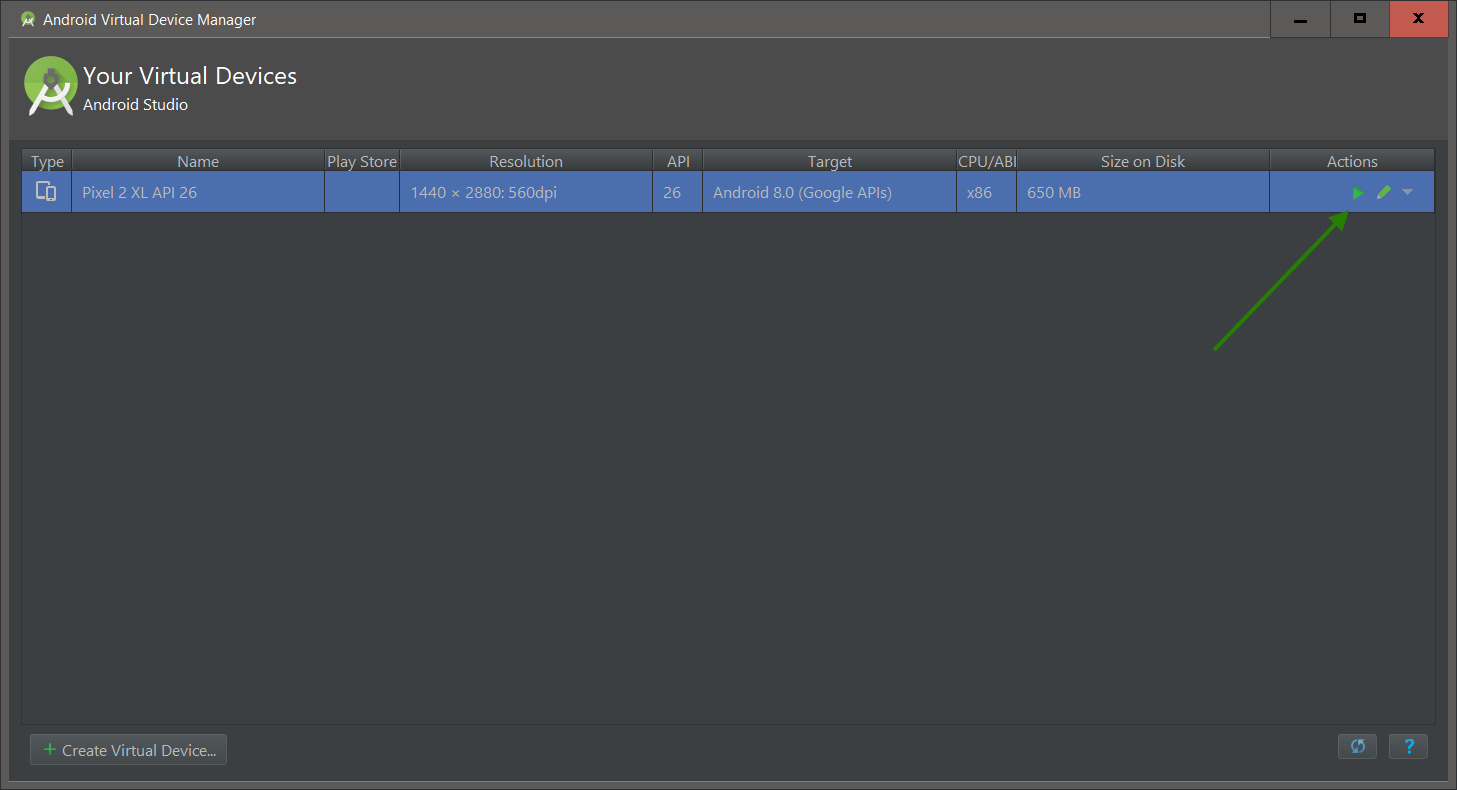
Wait for it.
And the android emulator should be running
trying again
> react-native run-android
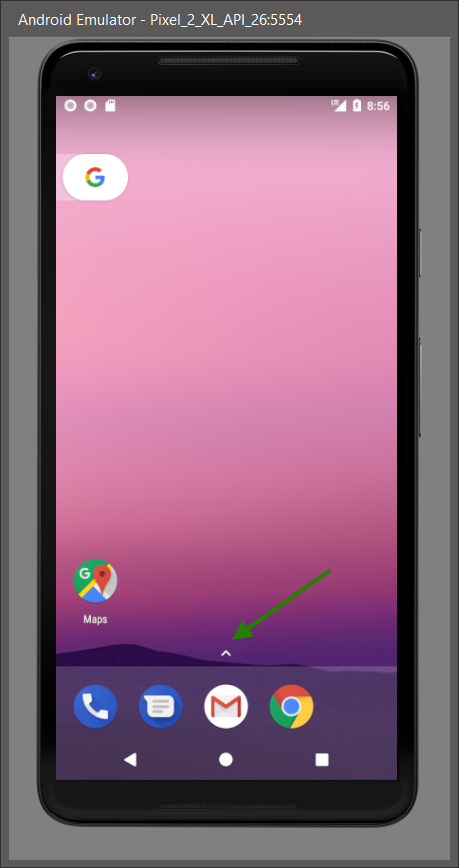
Hmmm, no immediate errors
Click the app drawer (the up caret above the gmail icon)
Your app should be in the top right
Drag it to the home screen and click

And the next Error #7
Error: Couldn't find preset "babel-preset-react-native-stage-0/decorator-support" relative to directory
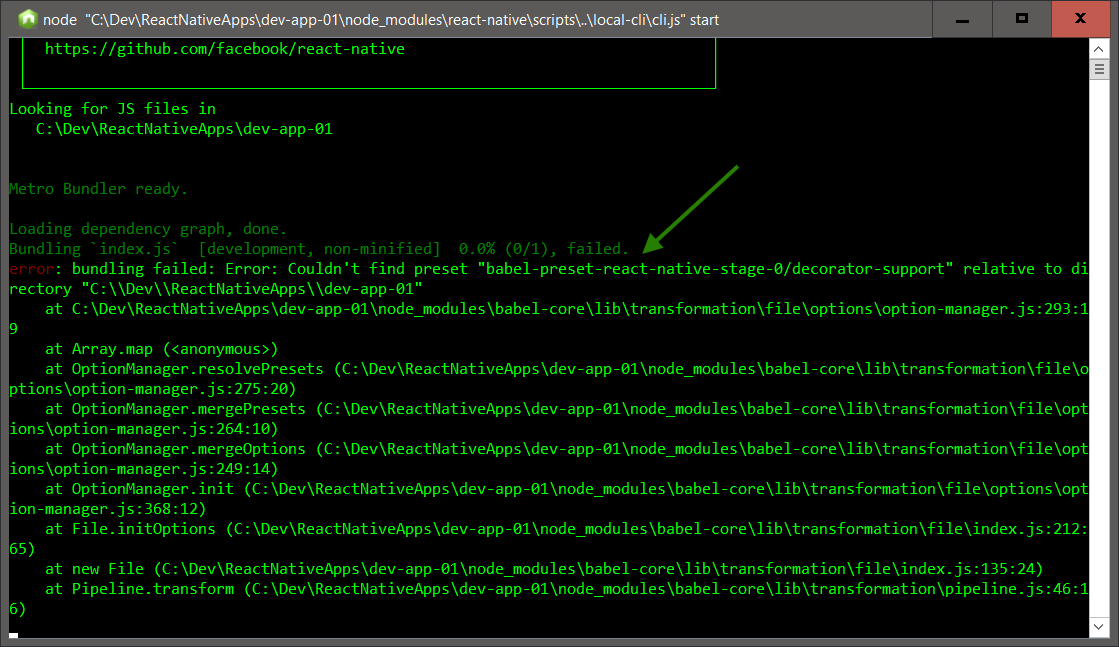
Note: Babel is a JavaScript transpiler. Babel enables us to write modern ES6/7 JavaScript that will be "transpiled" to widely-supported ES5 JavaScript.
So install the babel preset
> npm install babel-preset-react> babel-preset-react-native-stage-0
trying again
> react-native run-android
And the next Err .. no wait, it works!
Nice
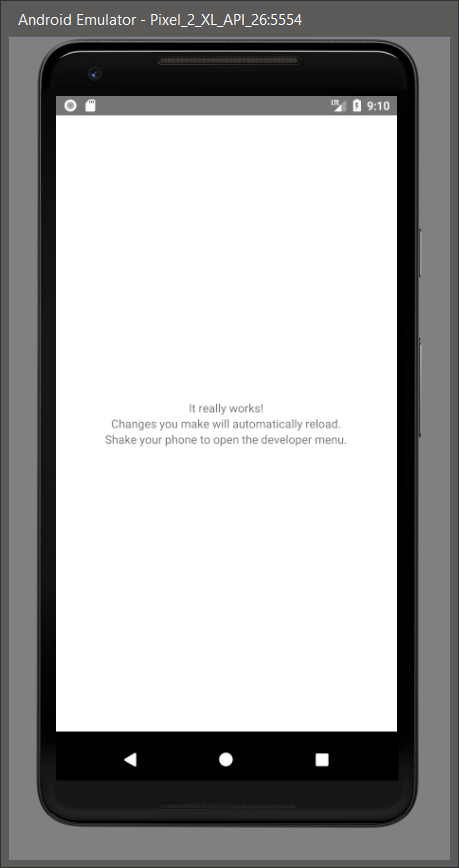
With the android emulator window active, press Ctrl+M to bring up the react native context menu
Select Enable Hot Reloading

Make a change to some text in your app.js
And its updated in the phone app
Cool
OK, I didn't get to the actual camera part this time,
but there was a lot of environment initialization, and the basics seem to be working.
So till next time..
End of document. Thanks for reading.